
How to Screen Record on Windows 11 and 10: 4 Free Screen Recorders Compared
 By Sleekshot Team
10 min read
By Sleekshot Team
10 min read
Short answer
On Windows 11, press Win + Shift + R, drag over the area and click Start. Snipping Tool records an MP4 and saves it to Videos > Screen Recordings. On Windows 10 (and 11), Win + Alt + R records the app you're in with Xbox Game Bar and saves it to Videos > Captures. To record the desktop with your voice, computer sound, a webcam bubble or arrows on screen, use a free screen recorder like Sleekshot or OBS Studio.
On this page
- Windows screen recorders compared
- Method 1: Snipping Tool (Windows 11, Win + Shift + R)
- Method 2: Xbox Game Bar (Windows 10 and 11, Win + Alt + R)
- Method 3: Sleekshot (free, with webcam, drawing and highlighted clicks)
- Method 4: OBS Studio (long recordings and streaming)
- Another option: PowerPoint screen recording
- Which screen recorder should you use?
- 5 tips for a clean screen recording
- Recording not working? Quick fixes
To screen record on Windows 11, press Win + Shift + R, drag a box over the area you want and click Start. Snipping Tool records it as an MP4 and saves it to C:\Users\<you>\Videos\Screen Recordings as soon as you click Stop. On Windows 10, Snipping Tool can't record video. There, press Win + Alt + R to record the app you're in with Xbox Game Bar, the other built-in screen recorder.
Both built-in recorders are free and fine for a quick clip. They stop being enough when you need the whole desktop, a webcam, or arrows and highlighted clicks in the video. That's where a free screen recorder for Windows, like Sleekshot or OBS Studio, comes in. Below are all four methods with exact steps, plus what each one can't do.
Windows screen recorders compared
| Method | How to start | Windows | What it records | Mic / computer sound | Webcam | Saves to |
|---|---|---|---|---|---|---|
| Snipping Tool | Win + Shift + R | 11 | An area you select | Yes / Yes | No | Videos\Screen Recordings (MP4) |
| Xbox Game Bar | Win + Alt + R | 10 and 11 | One app window, not the desktop | Yes / Yes | No | Videos\Captures (MP4) |
| Sleekshot (free app) | PrtSc → V → Ctrl + R | 10 (1809+) and 11 | An area, a window or a whole monitor | Yes / Yes | Yes, round bubble | Videos\Sleekshot (MP4) |
| OBS Studio (free app) | A button or your own shortcut | 10 and 11 (also macOS, Linux) | Anything: monitors, windows, cameras | Yes / Yes | Yes | Videos (MP4 or MKV) |
The short version: Snipping Tool for a quick area on Windows 11, Game Bar for games and single apps. Sleekshot is for tutorials and bug reports, OBS Studio for long recordings and streaming. Our screen recording shortcut cheat sheet lists every shortcut.
Method 1: Snipping Tool (Windows 11, Win + Shift + R)
Snipping Tool is the fastest built-in way to record part of the screen on Windows 11. It records any rectangle you draw, with your mic and computer sound, and there's nothing to install.
- Press Win + Shift + R. The screen dims and a toolbar appears at the top. Or open Snipping Tool, switch to Record and click New.
- Drag a rectangle over the area you want to record.
- Set the microphone and system audio buttons on the toolbar now. You can't change them once you start.
- Click Start. The toolbar shows the time and a Pause button.
- Click Stop. A window opens to play the clip, and Snipping Tool has already saved the MP4 to
C:\Users\<you>\Videos\Screen Recordings.
In that window, you can trim the start and end of the clip. Current versions also have Export GIF for clips up to 30 seconds. Longer videos only export the first 30 seconds.
Note: Snipping Tool on Windows 10 can't record video. If Win + Shift + R does nothing on Windows 11, update Snipping Tool in the Microsoft Store.
What it can't do: there's no webcam, no highlighted clicks and no drawing on the video while you record. For a 20-second "look, this button is broken" clip, none of that matters, and Snipping Tool is the right tool.
Method 2: Xbox Game Bar (Windows 10 and 11, Win + Alt + R)
Xbox Game Bar is built into Windows 10 and Windows 11 and records one app at a time. It was made for games, but it works with most programs, like a browser or PowerPoint. It can't record the desktop or File Explorer, and you can't select an area.
- Open the app you want to record and click inside it so it's the active window.
- Press Win + Alt + R to start recording right away. Or press Win + G and click the record button in the Capture widget.
- Press Win + Alt + M to turn your mic on or off.
- To finish, press Win + Alt + R again, or click the stop button on the small status bar.
- Find the MP4 in
C:\Users\<you>\Videos\Captures.
Four limits to know before you rely on it:
- If Windows says "Gaming features aren't available for the Windows desktop or File Explorer", Game Bar can't record that screen. Use one of the other methods.
- Recording stops on its own at the maximum length, 2 hours by default. You can change it to 30 minutes, 1 hour or 4 hours in Settings → Gaming → Captures. The same page sets the frame rate (30 or 60 fps) and whether Game Bar records sound.
- Game Bar only records the app you started in. If you switch to another window, it won't be in the clip.
- Game Bar uses your graphics card's video encoder. On some older PCs and virtual machines, the record button stays grayed out.
The full walkthrough, including recording the last few moments with Win + Alt + G, is in our Xbox Game Bar recording guide.
Method 3: Sleekshot (free, with webcam, drawing and highlighted clicks)
Sleekshot is a free screenshot and screen recording app for Windows 10 and 11. It records an area, a window or a whole monitor to MP4 with your mic, computer sound, a webcam bubble and highlighted mouse clicks. You can also draw arrows on screen while you record. There's no watermark, no time limit and no account.
You start a recording the same way you take a screenshot, so it only takes a few steps:
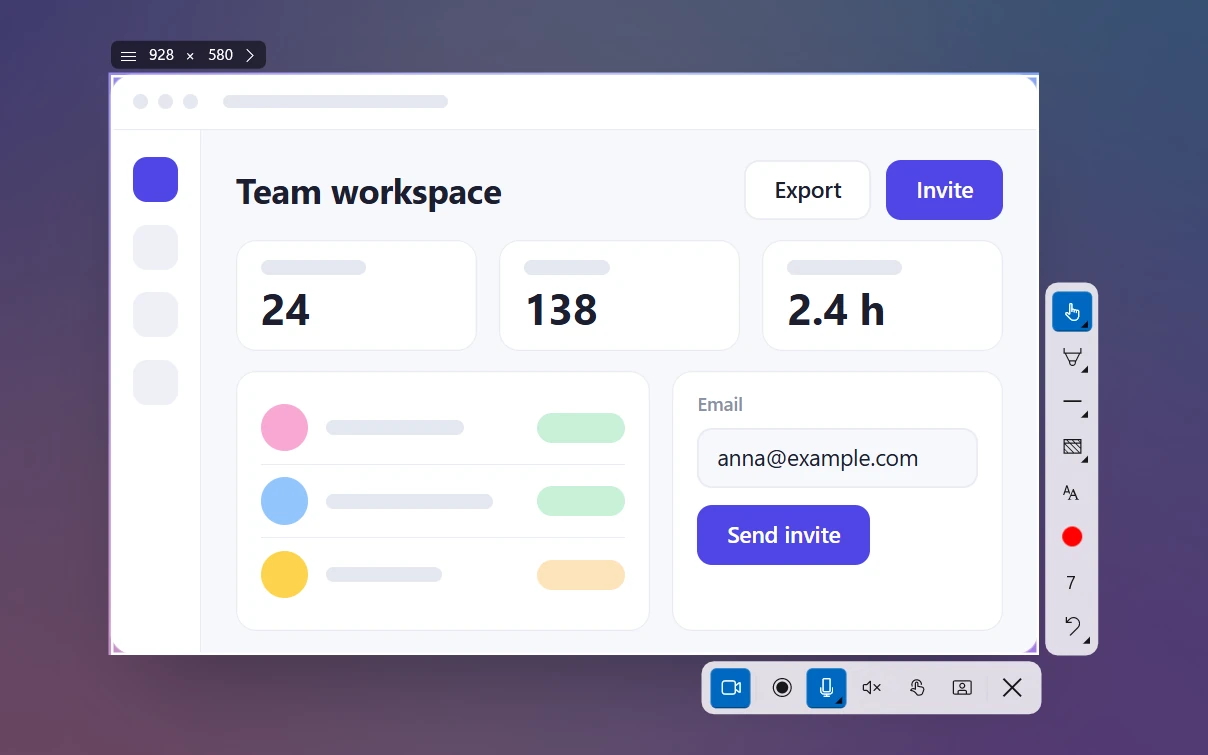
- Press PrtSc, Sleekshot's default shortcut. The screen dims.
- Drag over an area, click a window, or press Ctrl + A for the whole monitor.
- Press V to switch to the screen recorder. The recorder bar appears.
- Pick your microphone. The live level meter shows whether it can hear you. Turn on computer sound, click highlighting and the camera if you need them.
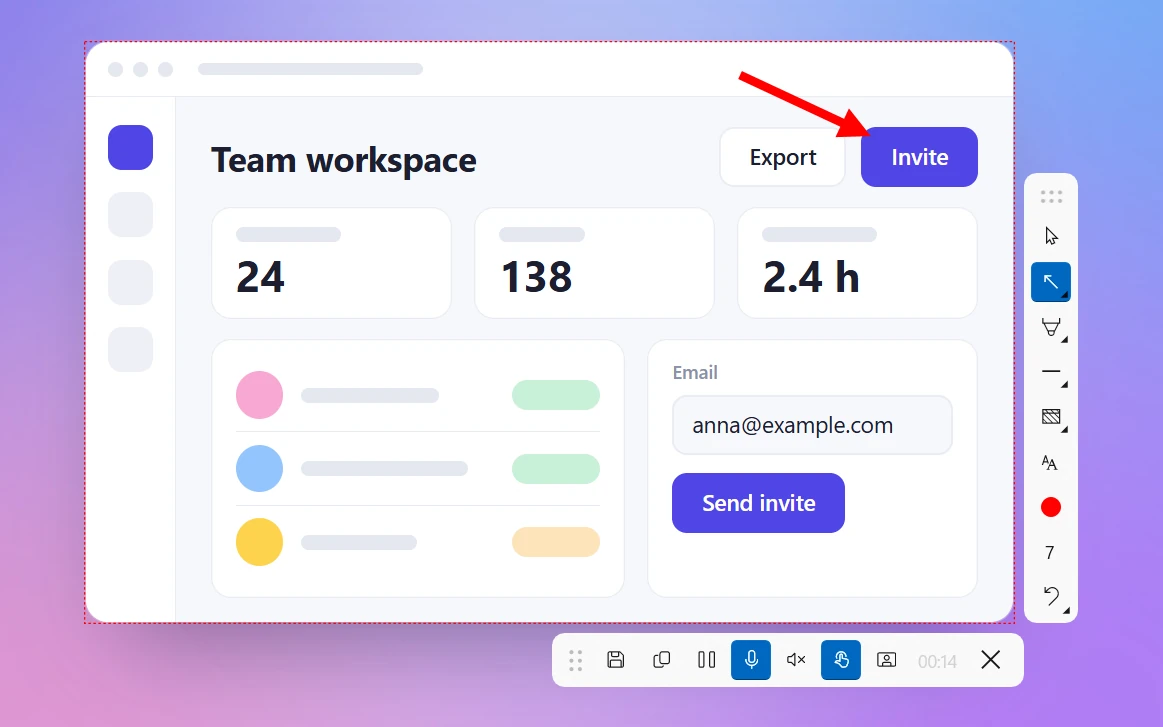
- Press Ctrl + R (Record). A red dashed outline marks the area being recorded, and the video bar shows a timer.
- When you're done, click Save to file. Or click Copy to clipboard and paste the MP4 into a chat or email like any file. Pause / Resume and Discard and Close are on the same bar.
Draw while you record. All the drawing tools stay available while you record, so you can add an arrow, a box or a highlighter stroke exactly where you're pointing. Click Cursor to go back to using the desktop. Sleekshot keeps its own toolbars out of the video, so viewers only see your screen and your drawings.
Webcam bubble. Turn on the camera, and a round webcam bubble appears over the recording. Drag it to any corner and resize it from 120 to 800 px. It's handy for course videos and video updates for your team.
The first time you record, Sleekshot asks Save recordings by default? Choose Save all recordings to keep every video in Videos\Sleekshot, or change the folder. Quality settings are in Settings → Video:
| Setting | Frame rate | Video bitrate | Rough file size per minute |
|---|---|---|---|
| Compact (default) | 20 fps | 2 Mbps | about 15 MB |
| Optimal | 30 fps | 5 Mbps | about 38 MB |
| High | 60 fps | 10 Mbps | about 75 MB |
The sizes are simple math (Mbps × 60 ÷ 8), plus about 1 MB per minute for the 128 kbps audio.
If PrtSc opens Snipping Tool instead of Sleekshot, Windows 11 has taken the key. Press Bind PrtSc to Sleekshot in Sleekshot's settings to take it back in one click, or you can pick another key. To do it by hand, turn off Settings → Bluetooth & devices → Keyboard → Use the Print screen key to open screen capture. On older Windows 11 builds, the switch is under Settings → Accessibility → Keyboard. Searching Settings for "print screen" finds it either way.
What it can't do: Sleekshot records one area at a time, MP4 only. It has no GIF export, no trimming or video editor and no scheduled recording, and the Mac version only takes screenshots. If you need to cut a video, open the MP4 in Clipchamp, which comes with Windows 11, or any other editor.
More details on the Sleekshot screen recorder page.
Method 4: OBS Studio (long recordings and streaming)
OBS Studio is a free, open-source recording and streaming app for Windows, macOS and Linux. It can record several monitors, windows, webcams and images at once and mix them into scenes. The catch is setup time. It's a full studio, not a quick tool.
- Download OBS Studio from obsproject.com. In the setup wizard, choose to optimize it for recording.
- Under Sources, click + and add Display Capture (a whole monitor) or Window Capture (one app).
- Look at the Audio Mixer. The Desktop Audio and Mic/Aux meters should move when there's sound.
- Click Start Recording, then Stop Recording.
Files go to your Videos folder by default. New installs of OBS Studio 32 and later record to Hybrid MP4, which survives a crash. You can change the format in Settings → Output. OBS has no recording shortcuts out of the box, so set them in Settings → Hotkeys.
Another option: PowerPoint screen recording
If you have Microsoft 365, PowerPoint has its own recorder under Insert → Screen Recording. Select an area, click Record, and stop with Win + Shift + Q. PowerPoint puts the video on the slide. Right-click it and choose Save Media as to get a separate file. It's good for a slide demo and awkward for anything else.
Which screen recorder should you use?
- A quick clip of part of the screen on Windows 11, nothing to install: Snipping Tool.
- A game or a single app on Windows 10: Xbox Game Bar.
- Tutorials, product demos and bug reports with your voice, webcam, arrows and highlighted clicks: Sleekshot.
- Hour-long sessions, several sources, live streaming: OBS Studio.
For a wider comparison with paid tools, see the best screen recorders for Windows and our list of free screen recorders without a watermark.
5 tips for a clean screen recording
- Turn on Do not disturb so chat and email pop-ups don't end up in the video. On Windows 11, click the clock in the taskbar and use the bell icon.
- Record an area, not the whole 4K desktop. An area of 1920 × 1080 or smaller keeps the text readable after YouTube or Slack compress it. See how to record part of the screen and how to record one monitor.
- Test five seconds of sound first and play it back. A muted mic is the most common reason to record again. Details in how to record your screen with audio.
- Match the frame rate to what you're recording. 20–30 fps is plenty for clicking through software. 60 fps is for games and fast scrolling. More in our guide to screen recording quality.
- Move the mouse slowly and pause for a second after each click. Highlighted clicks help viewers follow along.
Recording not working? Quick fixes
- The video is black. Usually it's protected content (streaming services) or hardware acceleration. See how to fix a black screen recording.
- There's no sound. The mic or system audio button was off when you started, or Windows blocks the microphone in Settings → Privacy & security → Microphone.
- The Game Bar record button is grayed out. You're on the desktop or in File Explorer, or your graphics card has no supported encoder. Use Snipping Tool, Sleekshot or OBS Studio.
- Win + Shift + R does nothing. You're on Windows 10, or Snipping Tool needs an update from the Microsoft Store.
- You can't find the file. Every app's folder is listed in where screen recordings are saved.
- The recording stopped on its own. Game Bar reached its maximum length, or the disk filled up. See how long you can screen record.
Frequently asked questions
Does Windows have a built-in screen recorder?
How do I screen record on Windows 10?
How do I screen record with sound on Windows?
Where do screen recordings go on Windows?
Is there a time limit for screen recording on Windows?
Can I record my screen and webcam at the same time?
Sleekshot Team
We build Sleekshot, a free screenshot and screen recording app for Windows and Mac. Every guide is checked on current Windows 11, Windows 10 and macOS builds.
Also available in: Deutsch Français Español Italiano Русский ភាសាខ្មែរ Bahasa Indonesia 简体中文 日本語