Screen Recording Quality on Windows: Resolution, FPS and Bitrate Settings
 By Sleekshot Team
9 min read
By Sleekshot Team
9 min read
Short answer
Screen recording quality comes from three settings: resolution (pixels), frame rate (how smooth motion looks) and bitrate (data per second, which also sets the file size). On Windows, you change them in your screen recorder's settings: Settings → Gaming → Captures for Xbox Game Bar, Settings → Video for Sleekshot (Compact, Optimal, High) and Settings → Video and Output for OBS Studio. Snipping Tool has no quality settings. For sharp software tutorials, record a 1920 × 1080 area at 30 fps and about 5 Mbps. That's roughly 38 MB per minute.
On this page
- Resolution, frame rate and bitrate: what each one does
- How big is a screen recording? MB per minute by bitrate
- Snipping Tool: no quality settings
- Xbox Game Bar: frame rate and video quality
- Sleekshot screen recorder: Compact, Optimal and High
- OBS Studio: resolution, fps and quality
- Recommended settings for each kind of video
- Why your screen recording looks blurry, and how to fix it
Screen recording quality comes down to three numbers. Resolution is how many pixels are in each frame. Frame rate is how many frames there are per second. Bitrate is how much data the recorder can use each second, and it also decides the file size.
To change them on Windows, open your screen recorder's own settings. For Xbox Game Bar, that's Settings → Gaming → Captures. For Sleekshot, it's Settings → Video, and for OBS Studio, Settings → Video plus Settings → Output. Snipping Tool has no quality settings at all.
For most people the target is simple: record a 1920 × 1080 area at 30 fps and about 5 Mbps. Text stays readable after YouTube, Slack or Teams compress the video again, and you use about 38 MB per minute. Below is what each setting does, how big the files get and where to change quality in every common Windows recorder.
Resolution, frame rate and bitrate: what each one does
Each setting controls a different kind of "quality". If you turn up the wrong one, files get bigger and the video doesn't look any better.
| Setting | What it controls | Typical values for screen recording | When it's too low | What raising it costs |
|---|---|---|---|---|
| Resolution | Detail: how many pixels each frame has | 1280 × 720, 1920 × 1080, 2560 × 1440 | Small text is soft or unreadable | Needs a higher bitrate to look as good |
| Frame rate (fps) | How smooth motion looks | 20–30 fps for apps, 60 fps for games | The cursor and scrolling stutter | More data, more work for the CPU or graphics card |
| Bitrate (Mbps) | How much data each second can use | 2–10 Mbps | Blocky smears when the screen changes | The file grows at the same rate |
Two things are easy to miss:
- In most screen recorders, the resolution is just the size of the area you record. Select a 1280 × 720 area and you get a 720p video. Select a 3840 × 2160 monitor and you get 4K. OBS Studio is the exception: it can scale the picture to another size.
- All the pixels and frames share the same bitrate. 5 Mbps looks great on a 1080p area at 30 fps and only so-so on a full 4K screen at 60 fps.
Almost every Windows recorder saves H.264 video in an MP4 file, which plays everywhere. Newer formats like HEVC or AV1 make smaller files at the same quality, but not every player, browser or editor can open them.
How big is a screen recording? MB per minute by bitrate
File size depends almost entirely on bitrate: MB per minute = Mbps × 60 ÷ 8, or simply Mbps × 7.5. Add about 1 MB per minute for 128 kbps sound.
| Video bitrate | Per minute | Per hour |
|---|---|---|
| 1 Mbps | ≈ 7.5 MB | ≈ 0.45 GB |
| 2 Mbps | ≈ 15 MB | ≈ 0.9 GB |
| 5 Mbps | ≈ 38 MB | ≈ 2.3 GB |
| 8 Mbps | ≈ 60 MB | ≈ 3.6 GB |
| 10 Mbps | ≈ 75 MB | ≈ 4.5 GB |
| 12 Mbps | ≈ 90 MB | ≈ 5.4 GB |
| 20 Mbps | ≈ 150 MB | ≈ 9 GB |
Recorders with a fixed bitrate, like Sleekshot's quality settings or OBS set to a constant bitrate, make files close to these numbers no matter what's on screen. Recorders that pick the bitrate on their own, like Snipping Tool, work differently. A still document makes a small file, and a scrolling web page or a video makes a much bigger one.
Here's what that looks like in practice. We measured MP4 files recorded on one of our work PCs between 2024 and 2026.
| Recorder | Settings | Frame size | Measured video bitrate | MB per minute |
|---|---|---|---|---|
| Sleekshot | Compact (default): 20 fps | 400 × 202 up to 3842 × 1866 | ≈ 2 Mbps at every size | ≈ 15–16 |
| Snipping Tool | No settings: 30 fps | 1920 × 1080 area | ≈ 6.6–8.7 Mbps | ≈ 50–65 |
| Snipping Tool | No settings: 30 fps | 3840 × 2016 area | ≈ 26 Mbps | ≈ 200 |
| Xbox Game Bar | 30 fps | 1920 × 1020 browser window | ≈ 7.5 Mbps | ≈ 57 |
For example, a 3 minute 47 second Sleekshot recording of a 1920 × 1020 area came out at 57.7 MB. A 2 minute 16 second Snipping Tool recording of a full 1920 × 1080 area was 144 MB. Your numbers will vary with the content, the app version and your graphics card, but the ratio holds: Snipping Tool trades file size for simplicity. If disk space is what you're really worried about, see how long you can screen record on Windows.
Snipping Tool: no quality settings
As of October 2026, Snipping Tool on Windows 11 (Win + Shift + R) has no resolution, frame rate or bitrate options for video. In our files, it recorded the selected area pixel for pixel at 30 fps and picked the bitrate itself. That ranged from about 1 Mbps for a small, mostly still window to 26 Mbps for an area close to 4K.
So you have two ways to affect quality and size:
- Select a smaller area. A 1280 × 720 area makes a much smaller file than the whole screen, and it stays sharp when played at its own size.
- Export a GIF for very short clips. Create GIF (Ctrl + G) in the window that opens after recording has low and high quality, but only for the first 30 seconds of the video.
If you need a specific frame rate or file size, use one of the recorders below.
Xbox Game Bar: frame rate and video quality
Xbox Game Bar keeps its quality settings in Windows Settings, not in Game Bar itself.
- Open Settings → Gaming → Captures.
- Under the recorded video options, set Video frame rate to 30 fps (recommended) or 60 fps.
- Set Video quality to Standard or High. High uses a higher bitrate and makes bigger files.
- If you want, turn on Capture mouse cursor when recording a game and choose the Audio quality.
Game Bar has no resolution setting. It records the window of the game or app you started it in, at that window's size. To get a 1080p clip of a browser, make the browser window 1920 × 1080 before you press Win + Alt + R. Maximizing it on a 1080p monitor does the same.
Windows itself warns that a higher frame rate or quality "may affect the quality of your game". On a slow laptop, stick with 30 fps and Standard. For the full walkthrough, see our Xbox Game Bar recording guide.
Sleekshot screen recorder: Compact, Optimal and High
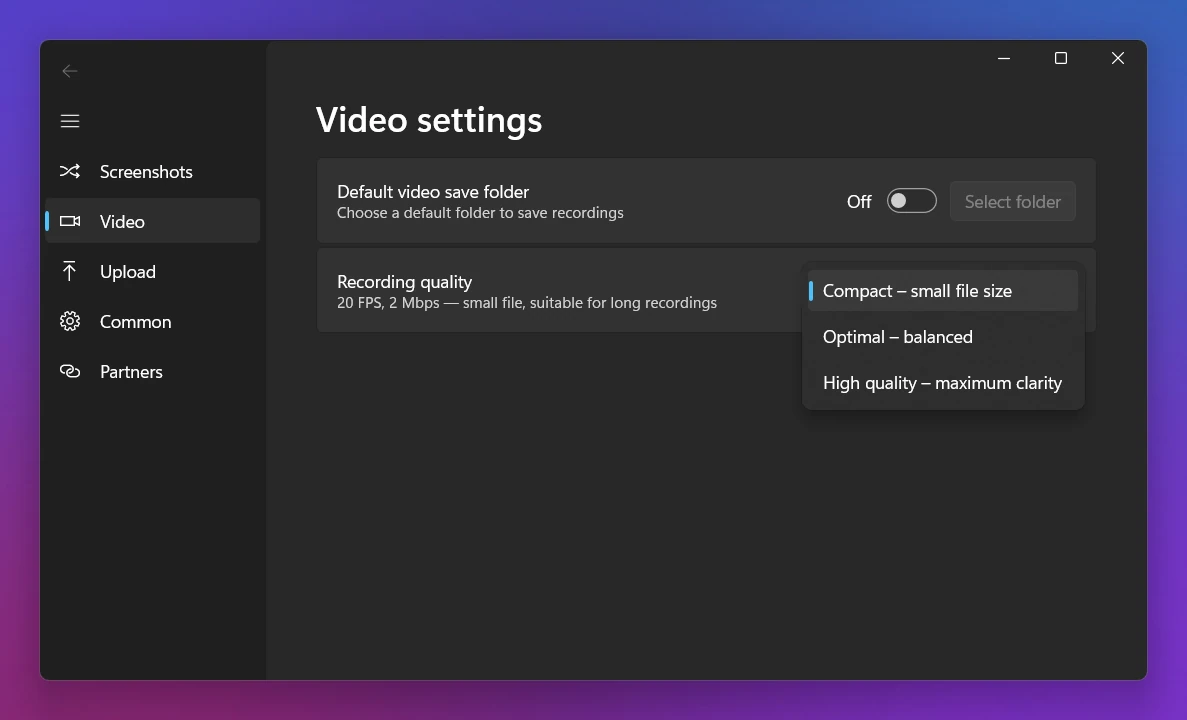
Sleekshot is a free screen recorder for Windows 10 and 11. Instead of technical settings, it gives you three choices in Settings → Video → Recording quality. Each one sets the frame rate and the video bitrate. Sound is always AAC at 128 kbps.
| Quality | Frame rate | Video bitrate | ≈ MB per minute | Good for |
|---|---|---|---|---|
| Compact (default) | 20 fps | 2 Mbps | 15 | Bug reports, long recordings, sending in a chat |
| Optimal | 30 fps | 5 Mbps | 38 | Tutorials and demos: the best balance of quality and size |
| High | 60 fps | 10 Mbps | 75 | Games, animations, fast scrolling |
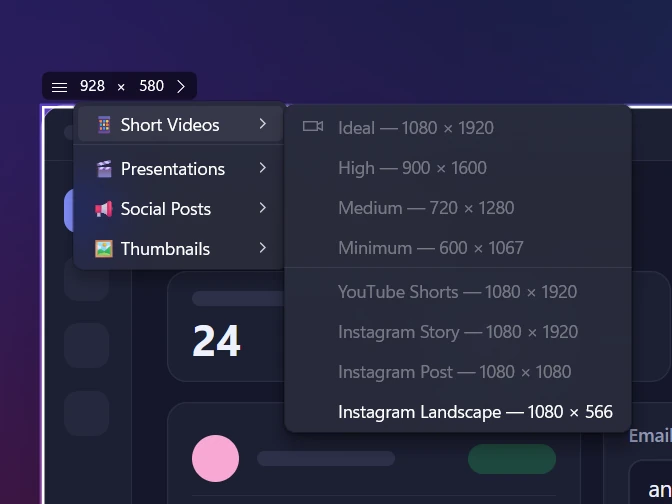
Since the bitrate is fixed, the frame size matters. The same 2 Mbps looks crisp on a small window. On a full 4K monitor, it gets soft as soon as something moves. So choose the area on purpose: drag over it, click a window or type an exact size into the size box. The ready-made sizes include Full HD (1920 × 1080), HD (1280 × 720) and vertical 1080 × 1920 for YouTube Shorts and Reels.
Our rule of thumb: keep Compact for anything you'd send to a coworker. Switch to Optimal for a tutorial you'll publish, and use High only when motion matters. Sleekshot records MP4 (H.264) only, with no trimming or GIF export. To cut the video, use Clipchamp or another editor.
OBS Studio: resolution, fps and quality
OBS Studio shows every setting, so it suits people who want full control.
- Settings → Video: set Base (Canvas) Resolution to your monitor's size. Set Output (Scaled) Resolution to the size you want the file to be, for example 1920 × 1080. Pick 30 or 60 under Common FPS Values.
- Settings → Output, Simple mode: choose Recording Quality. High Quality, Medium File Size is a good default. Indistinguishable Quality, Large File Size keeps small text cleaner. Lossless Quality, Tremendously Large File Size only makes sense if you'll edit the video heavily.
- Settings → Output, Advanced mode: the OBS knowledge base recommends quality-based rate control with values from 16 to 23. That's CQP for NVIDIA and AMD encoders and CRF for x264. Lower numbers mean better quality and bigger files.
New OBS profiles (version 32 and later) save to Hybrid MP4. Those files still play even if the PC crashes during a long recording.
Recommended settings for each kind of video
These targets work well for screen recordings in H.264. Sizes are for the video track at the bitrate shown.
| What you're recording | Area / resolution | Frame rate | Bitrate | ≈ MB per minute |
|---|---|---|---|---|
| Bug report, quick clip for a chat | 1280 × 720 to 1920 × 1080 | 20–30 fps | 2 Mbps | 15 |
| Software tutorial, product demo | 1920 × 1080 | 30 fps | 5 Mbps | 38 |
| Slide presentation, webinar | 1920 × 1080 | 30 fps | 2–5 Mbps | 15–38 |
| Game, animation, fast scrolling | 1920 × 1080 | 60 fps | 10–12 Mbps | 75–90 |
| Upload to YouTube in 1080p | 1920 × 1080 | 30 / 60 fps | 8 / 12 Mbps | 60 / 90 |
| Upload to YouTube in 4K | 3840 × 2160 | 30 / 60 fps | 35–45 / 53–68 Mbps | 260–340 / 400–510 |
The YouTube rows follow YouTube's recommended upload settings for standard (SDR) video. For a typical tutorial, 5 Mbps is plenty, because most of the screen stays still between clicks.
Why your screen recording looks blurry, and how to fix it
Check these causes in order.
- The video plays smaller than you recorded it. A full 2560 × 1440 or 4K screen squeezed into a 1080p player or a chat preview makes 14-pixel text tiny and soft. Record a 1920 × 1080 area or a single window instead, or zoom in the app (Ctrl + + in most browsers) before you record. Details are in how to record part of the screen.
- The bitrate is too low for the area. Text smears into blocks while you scroll and sharpens again when the screen stops. Pick a higher quality or a smaller area.
- The site compressed it again. Slack, Teams, messaging apps and YouTube all re-encode uploads. Right after you upload, YouTube may show only low resolutions while it's still processing the HD versions. Wait a few minutes before you judge.
- The frame rate is too low for the motion. Choppy, jumpy scrolling is a frame rate problem, not a sharpness one. Use 30 fps, or 60 fps for games.
- The picture looks washed out or too bright. That's usually HDR, not quality. Recordings of an HDR desktop can look gray on normal screens. Turn off HDR in Settings → System → Display while you record.
If you only need a sharp still image, a screenshot works better. See how to take a high-quality screenshot. For every way to record, start with how to screen record on Windows.
Frequently asked questions
How do I change screen recording quality on Windows 11?
Why is my screen recording blurry?
What is the best resolution and frame rate for screen recording?
How many MB is a one-minute screen recording?
Can I change the video quality in Snipping Tool?
Does 60 fps make a screen recording sharper?
Sleekshot Team
We build Sleekshot, a free screenshot and screen recording app for Windows and Mac. Every guide is checked on current Windows 11, Windows 10 and macOS builds.
Also available in: Русский