How to Make a Step-by-Step Guide With Screenshots (Free Method)
 By Sleekshot Team
10 min read
Short answer
Write the list of steps first. Then take one screenshot per screen at the same size, mark each click with an arrow or a numbered circle and blur anything private. Paste each image under its step in Word, Google Docs or your help center. A free screenshot tool with numbered steps, like Sleekshot for Windows, works with any desktop or web app. Scribe and Tango record browser clicks on their own, but as of October 2026 their free plans don't work with desktop apps.
On this page
- Ways to make a step-by-step guide: quick comparison
- Step 1: Write the steps before you take any screenshots
- Step 2: Pick one screenshot size and stick to it
- Step 3: Take one screenshot per screen, not per click
- Step 4: Mark the action with numbers, arrows and labels
- Step 5: Hide private info before you save
- Step 6: Save the files so the order is obvious
- Step 7: Put the guide together
- Scribe and Tango vs doing it yourself
- Built-in options on Windows and Mac
- Keep the guide up to date
To make a step-by-step guide with screenshots, write the steps first. Then take one screenshot per screen, mark what to click with an arrow or a numbered circle and paste each image under its step. Keep every screenshot the same size, and blur anything private before you save. That's the whole method. The tools only change how fast it goes.
Below is a seven-step method that works with free tools for any Windows app or website. We also compare it with Scribe and Tango, which record your clicks for you (prices as of October 2026).
Ways to make a step-by-step guide: quick comparison
There are two approaches: take each screenshot yourself, or let a tool record your clicks. Here's how the common options compare.
| Method | How you get the screenshots | Numbered steps and arrows | Blur | Cost (October 2026) | Best for |
|---|---|---|---|---|---|
| Sleekshot + Word or Google Docs | You press PrtSc for each step | Yes (S, 1) | Yes (B) | Free | Any Windows app, full control over each image |
| Snipping Tool + Word or Google Docs | Win + Shift + S for each step | Arrows and shapes, no numbers | No blur tool | Built into Windows 11 | An occasional short guide |
| Scribe | Records your clicks for you | Steps built from your clicks | Automatic blur on Enterprise | Free plan: web apps only. Pro Personal: $25/month billed yearly | Browser tasks you document often |
| Tango | Records your clicks for you | Highlights added for you | Pro plan | Free plan: 5 shared workflows, browser only. Pro: from $22/user/month billed yearly | Browser tasks shared with a team |
| Steps Recorder (psr.exe) | One screenshot per click with a text log | No | No | Built in, deprecated since 2023 | Existing setups only |
If you write a guide now and then, the first row is enough. Tools that record clicks pay off when you document long web tasks every week.
Step 1: Write the steps before you take any screenshots
Do the task once without taking screenshots, and write each action as one short line. Use a verb plus the exact button or menu name, like "Click Settings" or "Type your invoice number in Search". This list becomes the backbone of the guide, and it tells you exactly which screens you need.
Then get the screen ready so every screenshot looks clean:
- Use demo data. A test account means less to blur later.
- Silence notifications. Turn on Do not disturb in Windows 11 (Settings → System → Notifications) so no pop-up ends up in a screenshot.
- Hide clutter. Close unrelated tabs and hide the browser's bookmarks bar (Ctrl + Shift + B in Chrome and Edge).
- Keep the window size and zoom the same. Same window, same zoom for every step, so the screenshots match.
Step 2: Pick one screenshot size and stick to it
Screenshots of the same size line up in the document, and text stays the same size from step to step. Mixed sizes make a guide look patched together, even when the content is right.
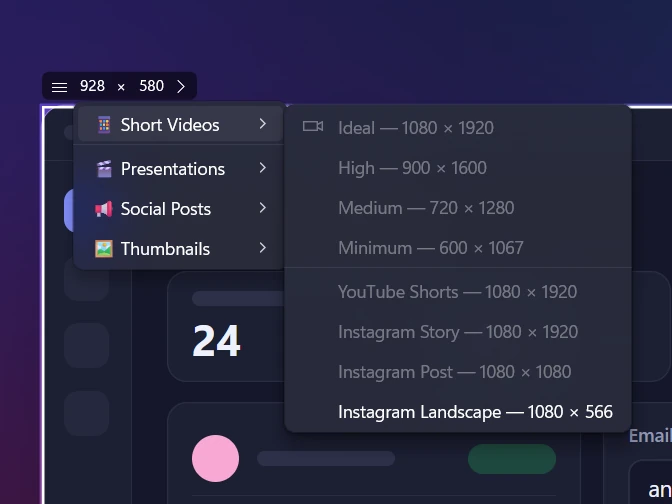
In Sleekshot, there are two ways to keep sizes the same:
- Grab the same window each time. Press PrtSc, hover over the app window until a dashed blue outline appears and click. As long as you don't resize the window, every screenshot comes out the same size.
- Use a fixed area. Drag a selection, then click the W × H numbers in the size box and type a size. Or pick a ready-made one like HD (1280 × 720). To move the selection over the right area without changing its size, drag the grip on the size box. Use the same numbers for every step.
Don't use full-screen screenshots of a big monitor. A 2560-pixel-wide screenshot shrunk to the width of a page makes the text in the app tiny. Crop to the part of the window the step is about. Our guide to high-quality screenshots has more on sharp text.
Step 3: Take one screenshot per screen, not per click
You need a new screenshot when the screen changes: a new page, a dialog, an open menu. If the reader clicks three things on the same screen, one screenshot with numbers 1, 2 and 3 is clearer than three almost identical images.
Two situations need extra care:
- Menus and hover effects. Sleekshot has no delay. If a menu closes before you can screenshot it, use Snipping Tool for that step. Open the app, choose Delay (for example, 5 seconds), start the snip and open the menu while it counts down.
- The mouse pointer. An arrow is usually clearer than the cursor. If the pointer itself matters, turn on Capture mouse cursor in Sleekshot's settings (it's off by default). More in how to take a screenshot with the cursor.
Step 4: Mark the action with numbers, arrows and labels
Each screenshot should answer one question at a glance: where do I click? In Sleekshot, the tools are right on the screenshot, one key each, so you add everything before you even save the image.
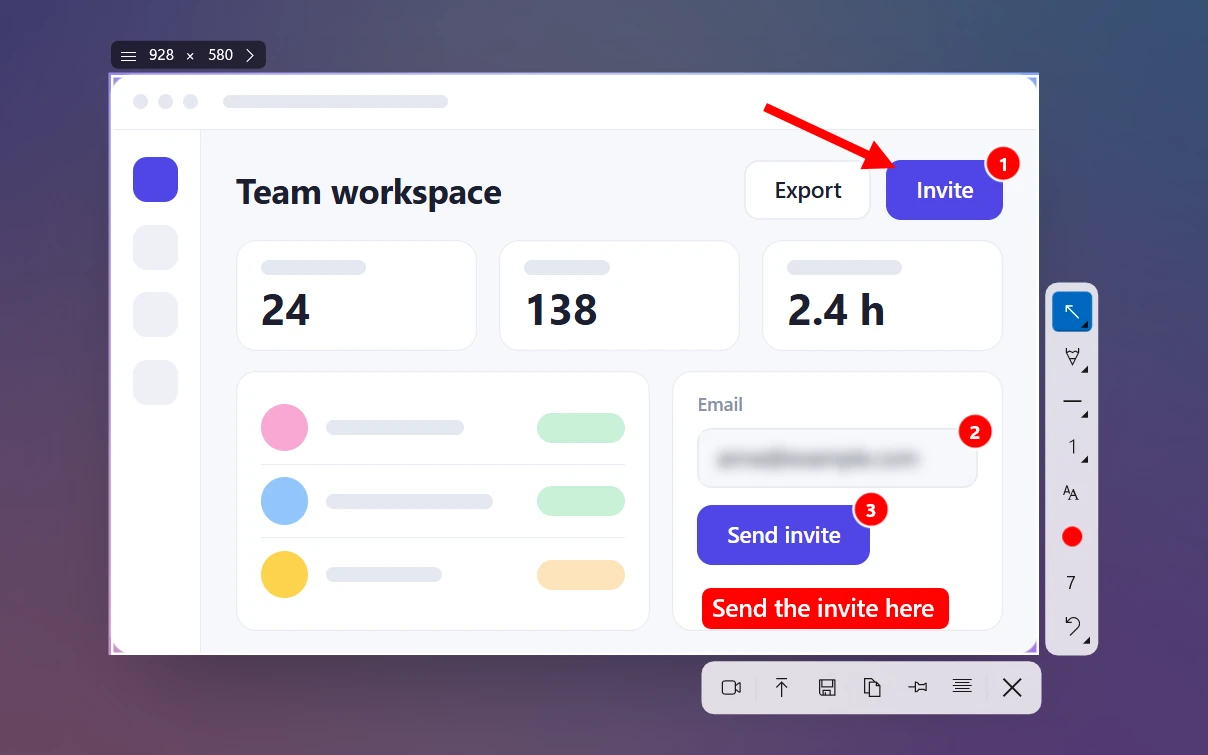
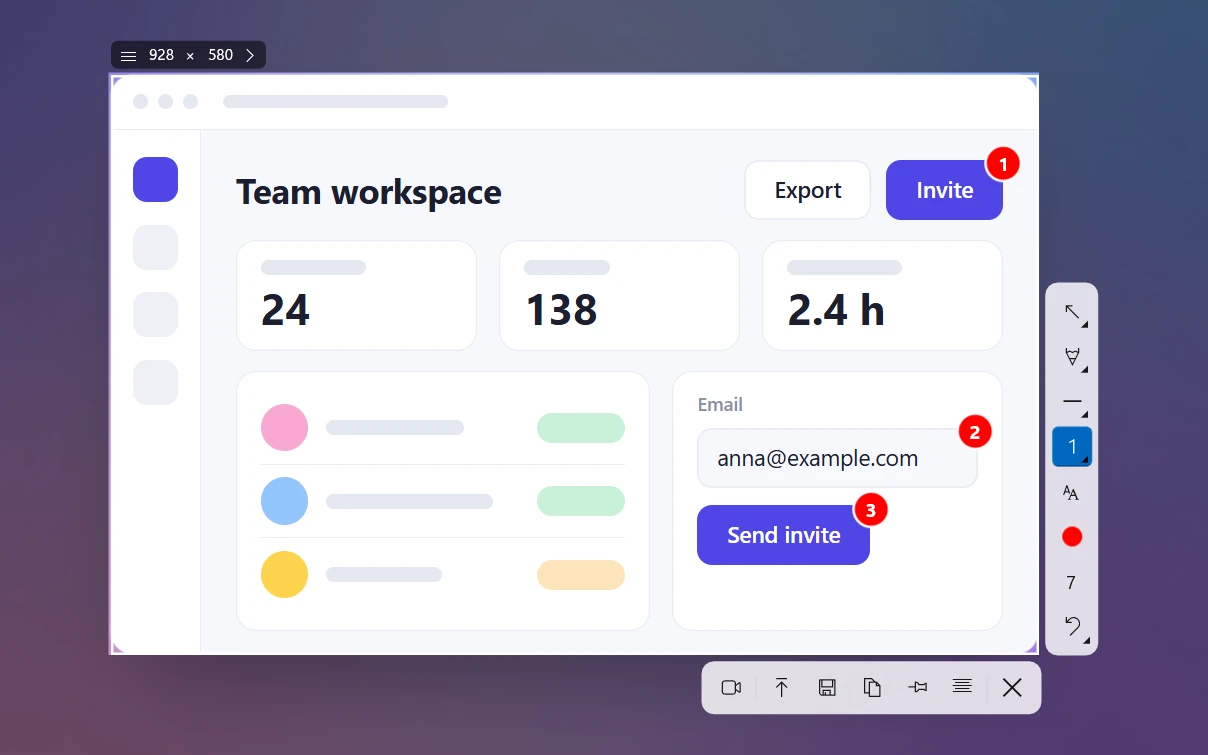
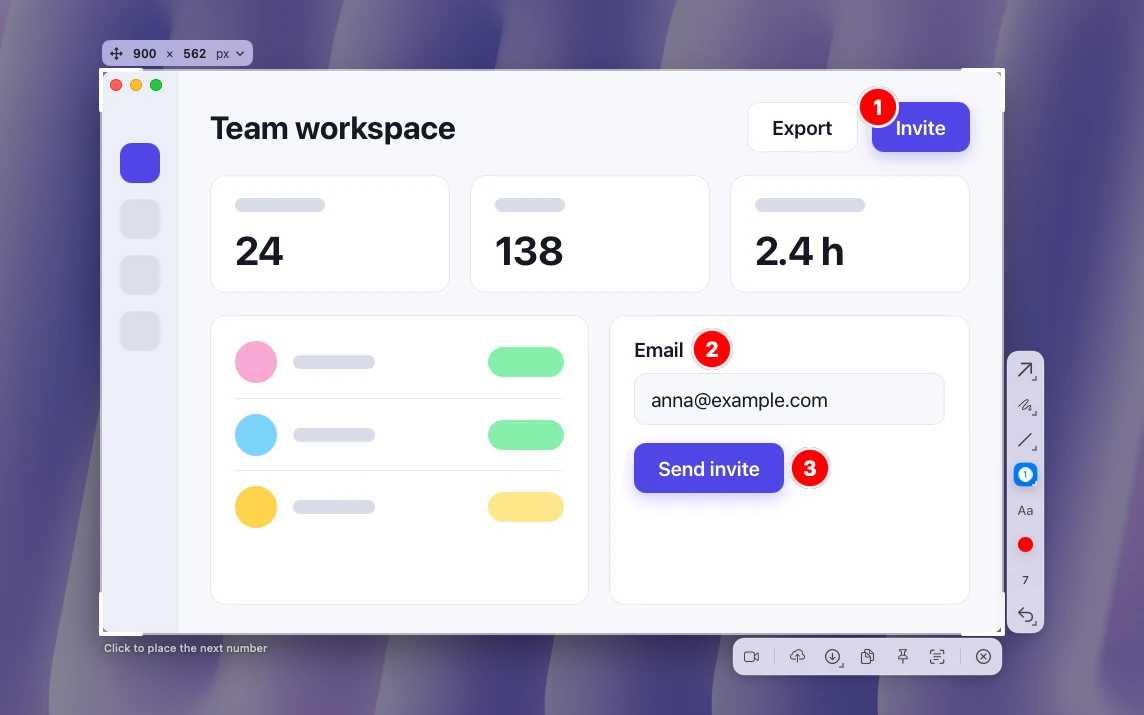
- Press S for Step and click each spot in order. Circles numbered 1, 2, 3 appear where you click.
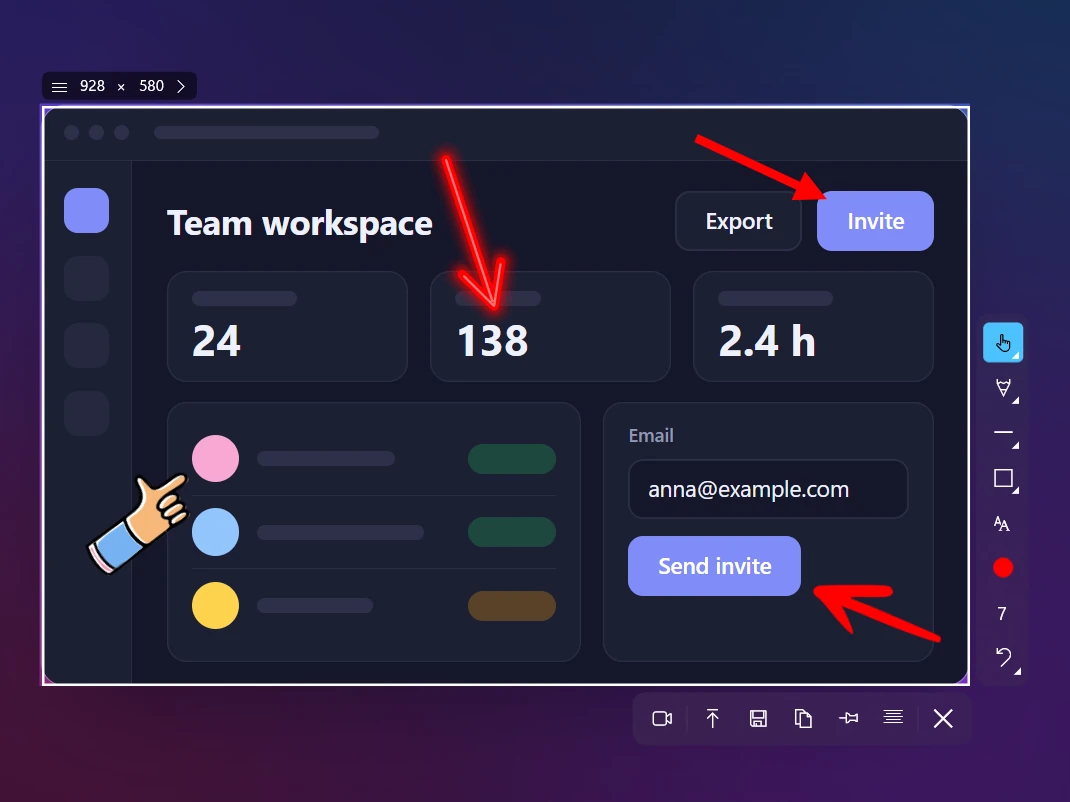
- Press 1 for an arrow when there's one thing to point at. Keys 2 to 7 switch to the other arrow styles.
- Press R for a rectangle around a field or panel, or H for the highlighter on a line of text.
- Press T for a short text label, like "Type your email here". Drag the label to move it. The mouse wheel changes the font size.
- Press C to change the color, and use the mouse wheel to change the thickness.
A few habits make a guide easier to follow:
- Refer to the numbers in the text. "Click File (1), then Export (2)." The reader's eyes jump between text and image without searching.
- One meaning per color. For example, red for "click here" across the whole guide.
- Numbers or arrows, not both. If you mix them for the same step, the reader will wonder whether they're separate actions.
Limits to know: you can't move arrows and shapes after you draw them. Press Ctrl + Z to remove the last one (one step back, no redo). You can drag text labels. Our guides to annotating screenshots and drawing arrows have more on where to put them.
Step 5: Hide private info before you save
Guides get forwarded, published and pasted into wikis, so check every screenshot for names, emails, customer data, tokens and URLs. Look beyond the obvious field. Tab titles, notification badges and the address bar give away more than people expect.
In Sleekshot, press B for a Blur rectangle over names and profile pictures. Press F for a Filled rectangle over anything that gives access, like API keys or passwords. A solid box can't be undone, while blurred text sometimes can be recovered. The details are in how to blur part of a screenshot.
Step 6: Save the files so the order is obvious
The fastest way is to skip files. Press Ctrl + C in Sleekshot and paste straight under the step in your document. If you also want the originals, for later updates or a translated version of the guide, save files:
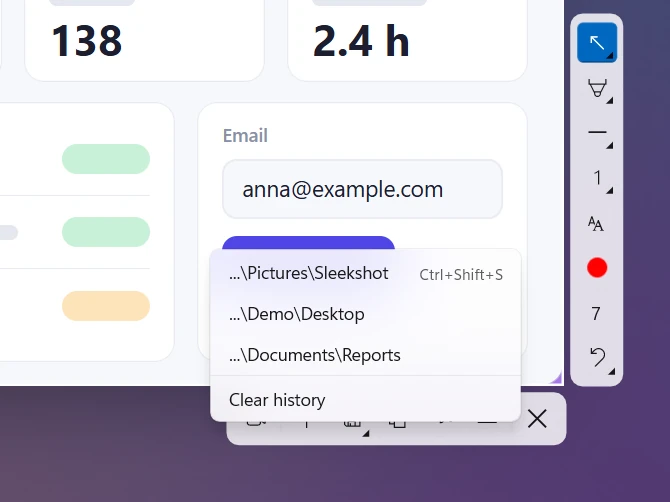
- Save (Ctrl + S) names each file
Sleekshot yyyy-MM-dd HH-mm-ss. Sort by name, and the screenshots line up in the order you took them, which is the order of the steps. - Quick save (Ctrl + Shift + S) saves to the last folder you used, with no dialog. Make a folder for each guide.
- Auto-save (Settings → Screenshots) saves a file every time you copy, so you can paste into the document and still keep the originals.
- PNG is the default format and the right one for screenshots of apps, because text stays crisp.
Step 7: Put the guide together
A good how-to guide has a predictable shape. Start with a title that names the task ("How to export invoices to PDF") and one sentence about the result. Then list what the reader needs before they start, the numbered steps and what they should see at the end.
For each step, write the instruction first and put the screenshot under it. Keep one action per step, and copy button and menu names exactly as they appear, in bold. Here's what one step looks like:
3. Click File (1), then Export (2). In the dialog, choose PDF and click Save.
   [screenshot: File menu with numbered circles 1 and 2]
Paste the screenshots with Ctrl + V. In Word and Google Docs, right-click an image to add alt text. It helps people who use screen readers and anyone whose images don't load. To share a copy that won't change, export a PDF: in Word, File → Save As → PDF; in Google Docs, File → Download → PDF Document (.pdf).
If someone needs the whole sequence as a single image for a chat, see how to combine screenshots. And if a process has 20 or more steps or depends on timing, a short video may explain it better. We compare the two in screenshot vs screen recording.
Scribe and Tango vs doing it yourself
Scribe and Tango watch your clicks in the browser and build a step-by-step guide on their own, with a screenshot and a line of text for each click. They're fast for web tasks, but desktop apps, editing and export are on paid plans. Here's what their pricing pages list as of October 2026:
| Scribe | Tango | By hand: Sleekshot + a document | |
|---|---|---|---|
| Free plan | Basic: web apps only, share by link or embed | 5 shared workflows, browser only | Free, no limits |
| Desktop apps | Pro plans | Pro plan | Yes, any Windows app |
| Editing screenshots, blur | Editing on Pro; automatic blur on Enterprise | Arrows and blur on Pro | Yes, while you take the screenshot |
| Export to PDF, HTML, Markdown | Pro plans | Pro plan | Any format your editor saves |
| Paid price | Pro Personal $25/month billed yearly ($35 monthly); Pro Team $13/seat/month billed yearly, minimum 5 seats | From $22/user/month billed yearly ($26 monthly); $15/user/month billed yearly for 3+ users | Free |
When to pick a tool that records clicks: you document long browser tasks every week, and the guides live in a shared workspace. Your team will also need to pay for it. When to do it yourself: you write guides now and then or document desktop software. Or you want each screenshot cropped and marked exactly the way you'd explain it. Guides made automatically usually need some editing anyway, because they record every click, including the ones the reader doesn't need.
Built-in options on Windows and Mac
You can make a decent guide without installing anything. It just takes more steps.
- Snipping Tool in Windows. Win + Shift + S takes a screenshot of an area. Click the notification to open the editor, which has a pen, a highlighter and Shapes for arrows and rectangles. There are no numbered steps and no blur tool, so number the steps in your text instead. The Delay option helps with menus.
- Steps Recorder in Windows. It still comes with Windows and saves a screenshot for every click with a text description. But Microsoft deprecated it in November 2023, has shown a warning in it since February 2024 and plans to remove it. Microsoft recommends Snipping Tool, Xbox Game Bar or Clipchamp for screen recording instead.
- Mac. Shift + Command + 4 takes a screenshot of an area. Click the thumbnail to open Markup for arrows, shapes and text. Markup has no numbered steps, but Sleekshot for Mac does, and it's free. Press ⌘ + ⇧ + 2, select an area, press S for step numbers and click each spot in order to place circles 1, 2 and 3. It has real blur too, and a number you put in the wrong place can be selected and moved.
Keep the guide up to date
Apps change, and an outdated screenshot is worse than none, because readers trust it. Three habits keep guides current:
- Date the guide. Add "Checked October 2026" and the app version near the top.
- Keep the originals. If you save files for each guide, you only redo the steps that changed. At the same size, the new screenshots drop right in.
- Reread the text after you redo a screenshot. If a button was renamed, the bold name in the step has to match.
Before you publish, check for the common screenshot mistakes: dialogs cut off at the edge, unreadable text, leftover personal info.
Frequently asked questions
What is the easiest way to make a step-by-step guide with screenshots?
How do I add numbered steps to a screenshot?
Is there a free alternative to Scribe or Tango?
How many screenshots should a step-by-step guide have?
What size should screenshots in documentation be?
Does Windows have a built-in step recorder?
Sleekshot Team
We build Sleekshot, a free screenshot and screen recording app for Windows and Mac. Every guide is checked on current Windows 11, Windows 10 and macOS builds.
Also available in: Deutsch Français Español Italiano Русский ភាសាខ្មែរ Bahasa Indonesia 简体中文 日本語