How to Annotate a Screenshot (Windows & Mac, Free Tools)
 By Sleekshot Team
8 min read
Short answer
To annotate a screenshot, open it in an editor and add arrows, boxes, numbered steps, highlights, text or blur. On Windows 11, Snipping Tool has a pen, highlighter and shapes (press Win + Shift + S, then click the notification). On a Mac, click the screenshot thumbnail to open Markup. If you want text, blur and step numbers in one place, use a free app like Sleekshot. You draw right on the screenshot before you save it.
On this page
- Arrows, boxes, steps and blur: what each tool is for
- How to annotate a screenshot on Windows 11 with Snipping Tool
- How to annotate a screenshot on a Mac with Markup
- How to annotate a screenshot in Sleekshot (Windows)
- 7 rules for clear screenshot annotations
- Screenshot annotation tools compared (October 2026)
To annotate a screenshot, open it in an editor and add what the viewer needs. Usually that's an arrow to the right button, a box around the key area, numbered steps, a short label and blur over anything private. On Windows 11, the built-in Snipping Tool handles arrows, boxes and highlighting. On a Mac, click the screenshot thumbnail to open Markup. If you need text, blur and step numbers together, a free screenshot app is faster.
Below: what each tool is for, step-by-step instructions for Windows and Mac, tips that keep a screenshot easy to read, and a comparison of free and paid tools as of October 2026.
Arrows, boxes, steps and blur: what each tool is for
Six tools cover almost every screenshot you'll ever mark up: arrow, box, step number, highlighter, text label and blur. Picking the right one matters more than which app you use.
| Tool | Use it for | Common mistake |
|---|---|---|
| Arrow | Pointing at one button, field or value | The arrowhead covers the very thing it points at |
| Rectangle or ellipse | Framing an area: a panel, a table row, an error message | A thick frame that hides the edges of what's inside |
| Step numbers | Showing the order of clicks: 1, 2, 3 | Using numbers and arrows for the same steps |
| Highlighter | Marking a line of text the reader should read | Using it on private data, which stays readable |
| Text label | A short instruction or name: "Click Export" | Full sentences that belong in your message, not the image |
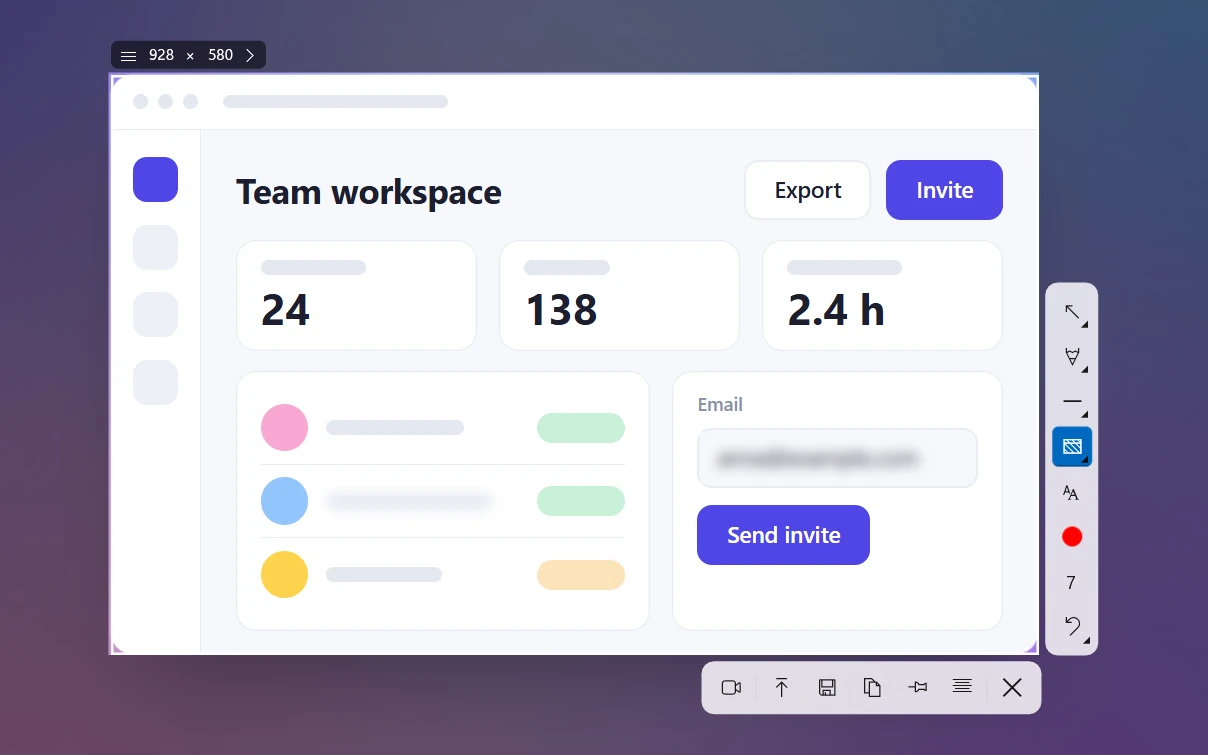
| Blur or pixelate | Hiding emails, names, tokens, faces | Blurring only part of the data, or missing the browser tab title |
| Line or pen | Underlining, quick freehand marks | Shaky freehand circles where a rectangle would look cleaner |
Most screenshots need two or three of these, not all seven. A bug report usually gets a box around the error and a blurred email address. A how-to gets numbered steps and one label.
How to annotate a screenshot on Windows 11 with Snipping Tool
Snipping Tool comes with Windows 11. It has a pen, highlighter, shapes (rectangle, oval, line, arrow), eraser and crop. That's enough for arrows and boxes.
- Press Win + Shift + S and drag over an area. On Windows 11, PrtSc opens the same toolbar by default.
- Click the notification in the bottom-right corner to open the editor.
- Use Shapes for arrows and boxes, Highlighter for a line of text and Pen for freehand marks. Each tool has its own color and thickness options.
- Press Ctrl + S to save or Ctrl + C to copy.
What's missing: as of October 2026, Microsoft's docs list no tool for typed text, no blur and no step numbers. For text, Microsoft suggests sending the screenshot to Paint from Snipping Tool's Edit menu. Our guide to editing screenshots on Windows covers Paint and the Photos app too.
How to annotate a screenshot on a Mac with Markup
Markup comes with macOS. It opens straight from the screenshot thumbnail and has shapes (including an arrow), text, sketching and crop.
- Take a screenshot. Press Shift + Command + 4 for an area or Shift + Command + 3 for the whole screen.
- Click the thumbnail in the bottom-right corner, and the Markup window opens. If the thumbnail is already gone, open the file in Preview and click the Markup button.
- Use Shapes for an arrow, rectangle or oval, Text for a label, and Sketch or Draw for freehand marks. Shape Style, Border Color and Text Style change the look.
- Click Done to save.
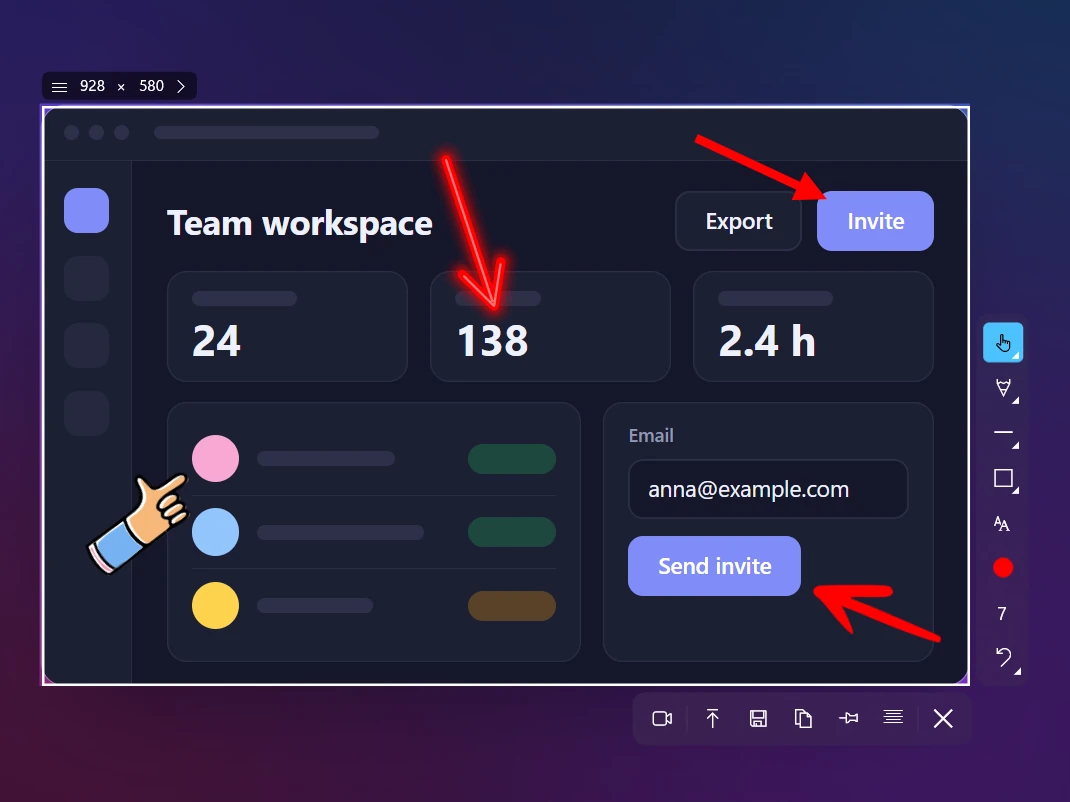
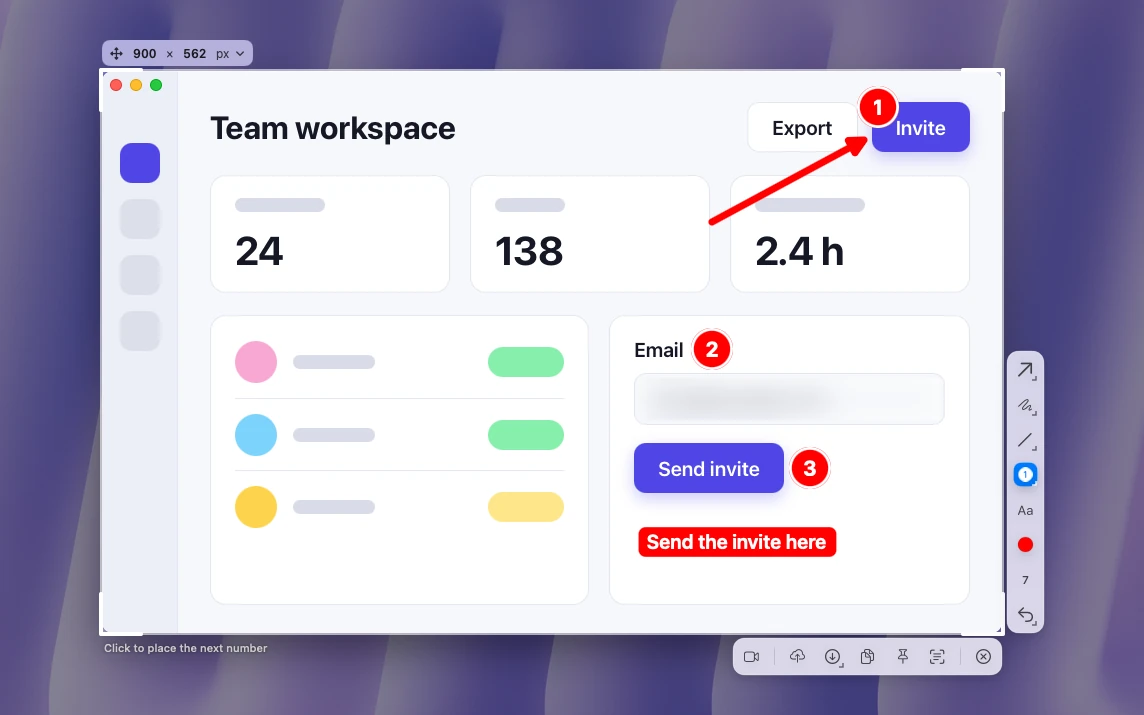
Markup has no blur or pixelate tool, so cover private data with a filled shape instead. Sleekshot for Mac is a free menu bar app for screenshots and screen recording (Mac App Store; screenshots on macOS 12 or later, recording on macOS 13 Ventura or later). Press ⌘ + ⇧ + 2, select an area and draw right on the screenshot. You get 7 arrow styles on keys 1 to 7, boxes (R) and ellipses (E) in 7 styles, a highlighter (H), real blur (B), step numbers (S) and text in 6 styles (T). Nothing is baked in until you save: select an arrow or box later to move, resize or rotate it, and ⇧ + ⌘ + Z brings back what you undid. Our guide to editing a screenshot on a Mac goes through each tool.
How to annotate a screenshot in Sleekshot (Windows)
Sleekshot is a free screenshot and screen recording app for Windows 10 and 11. Every tool has its own key, and you draw right on the screenshot, so you never open a separate editor.
- Press PrtSc. Drag over an area, click a window, or press Ctrl + A for the whole monitor.
- Frame the important part with a rectangle (R) or ellipse (E). The filled versions are F and O.
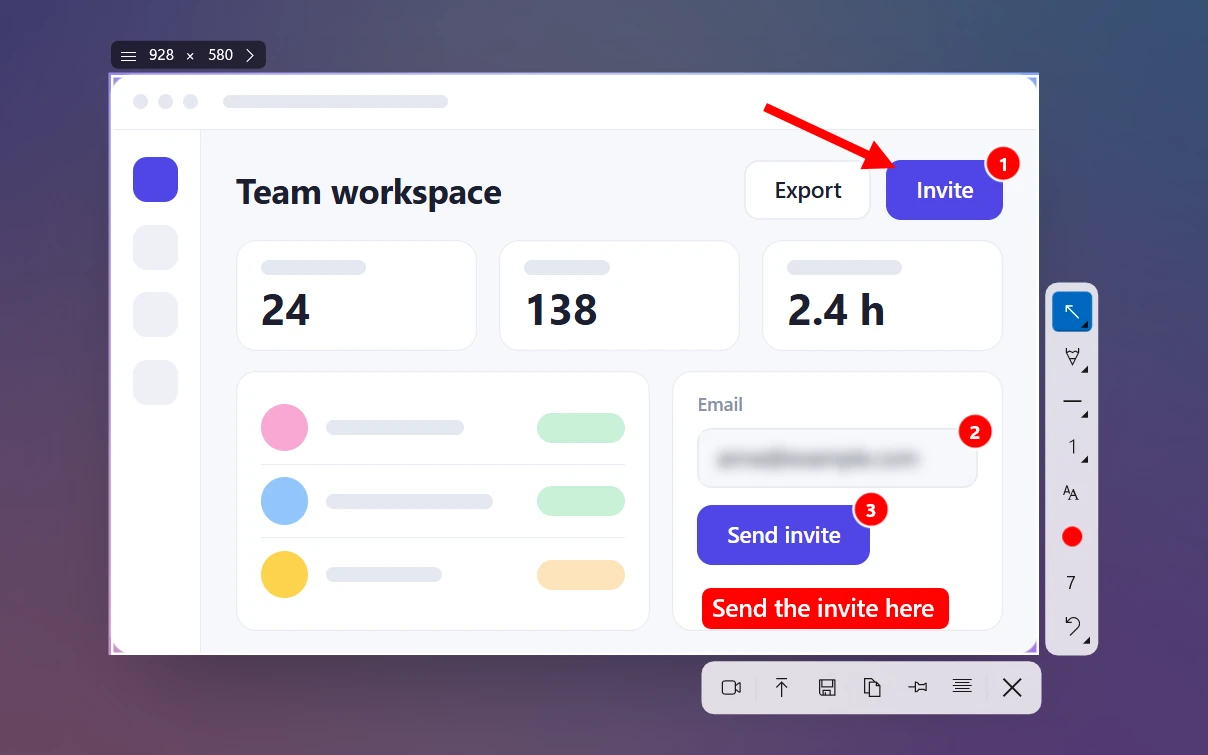
- Point with an arrow (1). There are 7 arrow styles on keys 1 to 7. Hold Shift to snap the angle to 0, 45 or 90 degrees.
- Number the steps with S. Each click adds the next number: 1, 2, 3.
- Mark text with the highlighter (H).
- Explain with a text label (T). Double-click a label to switch between a filled label and plain text. Drag it to move it, and scroll the mouse wheel to change the font size.
- Hide private data with the Blur rectangle (B).
- Press C to change the color (20 colors) and scroll the mouse wheel to change the thickness. Ctrl + Z removes the last thing you drew.
- Copy with Ctrl + C, save with Ctrl + S, or get a link with Ctrl + U.
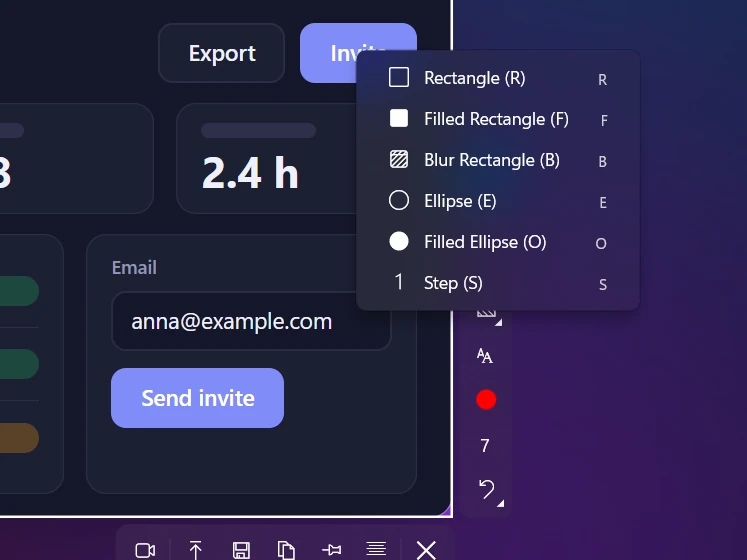
If you mostly use one tool, pick it in Settings → Screenshots → Default drawing tool. It's ready the moment you select an area. The full list is on the arrows, steps and blur page.
Good to know: you draw while taking the screenshot. Sleekshot doesn't open image files you saved earlier. Arrows and shapes can't be moved once drawn, only removed with Ctrl + Z, and there's no redo. Text labels can be dragged.
7 rules for clear screenshot annotations
Most of it comes down to adding less. These rules work in any app, built in or not.
- Crop to the task first. If the reader needs one dialog box, don't send the whole 4K desktop. A tight crop does half the explaining.
- One arrow per target. Start the arrow in empty space and stop the tip just short of the target, so the target stays visible. Our guide to drawing arrows on screenshots has more on placement.
- Use numbers for a sequence. Three numbered circles show the order of clicks better than three arrows. See the step-by-step screenshot guide.
- One accent color, one meaning. For example, red for "click here" and yellow highlighter for "read this". Too many colors make people stop and decode.
- Keep labels short. Two to six words. On busy backgrounds, use a filled label so the text doesn't get lost. Adding text to a screenshot has more on readability.
- Blur or cover private data. Never highlight it. Check tab titles, the bookmarks bar, notifications, profile pictures and the URL, not just the obvious email field. More in how to blur a screenshot.
- Check it at the size people will see it. Chat apps show a small thumbnail first. If a label is hard to read there, make it bigger or crop tighter.
For bug reports, see how to make screenshots for bug reports.
Screenshot annotation tools compared (October 2026)
Built-in tools are fine for arrows and boxes. For text, blur and step numbers in one place, you need a dedicated app. Here's how the usual options compare, based on each company's docs as of October 2026.
| Tool | Platforms | Price | Arrows | Text | Blur / pixelate | Step numbers |
|---|---|---|---|---|---|---|
| Sleekshot | Windows 10, 11 | Free | Yes, 7 styles | Yes | Yes | Yes |
| Sleekshot for Mac | macOS 12+ | Free | Yes, 7 styles | Yes | Yes | Yes |
| Snipping Tool | Windows 11 | Built in | Yes (Shapes) | No (Insider tests only) | No | No |
| Paint | Windows | Built in | Block arrows only | Yes | No | No |
| macOS Markup | macOS | Built in | Yes | Yes | No | No |
| ShareX | Windows | Free, open source | Yes | Yes | Yes | Yes |
| Greenshot | Windows | Free, open source | Yes | Yes | Yes | Yes (counter) |
| Snagit | Windows, Mac | $39 per year | Yes | Yes | Yes | Yes |
How to choose: if you mark up a few screenshots a month, stick with Snipping Tool or Markup. If you write instructions, bug reports or support replies every day, pick an app where text, blur and numbers are one key away. ShareX has the most options and the most settings to learn. Greenshot opens a separate editor window. Snagit is the most polished paid option. Sleekshot is the fastest of the free ones, because you add everything before the screenshot is even saved as a file.
Frequently asked questions
How do I annotate a screenshot on Windows?
How do I mark up a screenshot on a Mac?
Does a highlighter hide sensitive information in a screenshot?
What is the best free screenshot annotation tool?
Can I move an arrow or label after drawing it in Sleekshot?
Sleekshot Team
We build Sleekshot, a free screenshot and screen recording app for Windows and Mac. Every guide is checked on current Windows 11, Windows 10 and macOS builds.
Also available in: Deutsch Français Español Italiano Русский ភាសាខ្មែរ Bahasa Indonesia 简体中文 日本語