
How to Screenshot on a Lenovo Laptop: ThinkPad, IdeaPad, Yoga and More
 By Sleekshot Team
10 min read
Short answer
On any Lenovo laptop, press Win + Shift + S to screenshot part of the screen, or Win + PrtSc to save the whole screen to Pictures > Screenshots. On many ThinkPads made before 2024, the PrtSc key is in the bottom row, between the right Alt and Ctrl keys. On newer ThinkPads, it's an F-key (F9 on the T14 Gen 5 and X1 Carbon Gen 13). On IdeaPad and Yoga models, it's in the top row. If the key does nothing, switch FnLock with Fn + Esc or hold Fn.
On this page
- Lenovo screenshot shortcuts at a glance
- Where the PrtSc key is on your Lenovo
- Method 1: Win + Shift + S (works on every Lenovo)
- Method 2: The PrtSc key
- Method 3: Win + PrtSc (save the whole screen to a file)
- Method 4: Alt + PrtSc (one window only)
- Method 5: The Snipping Tool app (delay, text, recording)
- FnLock, Lenovo Vantage and BIOS: make the top row behave
- Faster way: Sleekshot on a Lenovo laptop
- Lenovo tablet or Chromebook?
- If PrtSc does nothing on your Lenovo
To take a screenshot on a Lenovo laptop, press Win + Shift + S, drag over the area you need and paste it with Ctrl + V. To save the whole screen as a file, press Win + PrtSc. The PNG lands in Pictures\Screenshots. Both shortcuts work on every ThinkPad, IdeaPad, Yoga and Legion running Windows 10 or 11.
The Lenovo-specific part is finding the PrtSc key. On many ThinkPads, it isn't in the top row at all. It's in the bottom row, between the right Alt and Ctrl. On the newest ThinkPads, it moved to an F-key. On IdeaPad and Yoga models, it shares the top row with other functions, so FnLock decides whether you need Fn. Below: where the key is on your model, every method, and what to change in Lenovo Vantage. Key positions come from Lenovo's own user guides, checked in October 2026.
Lenovo screenshot shortcuts at a glance
These shortcuts are part of Windows, so they work the same on every Lenovo laptop. Only the location of PrtSc changes from model to model.
| What you want | Keys | Where the screenshot goes |
|---|---|---|
| Part of the screen | Win + Shift + S | Clipboard + Pictures\Screenshots (Windows 11) |
| Whole screen as a file | Win + PrtSc | Pictures\Screenshots (PNG) |
| Whole screen or the Snipping Tool toolbar | PrtSc | Windows 11: opens the toolbar. Windows 10: clipboard |
| Only the active window | Alt + PrtSc | Clipboard |
| Open the Snipping Tool app | Fn + PrtSc (ThinkPads before 2024) or the F10 key (2024–2025 ThinkPads) | Wherever you save it |
| Screenshot in a game | Win + Alt + PrtSc | Videos\Captures |
If you only remember one, make it Win + Shift + S. It doesn't need a PrtSc key, it doesn't care about FnLock, and it lets you pick a rectangle, a window, the full screen or a freeform shape.
Where the PrtSc key is on your Lenovo
Lenovo has used three different layouts, which is why people can't find the key. Check your keyboard against this table.
| Lenovo laptop | Where Print Screen is | How to press it |
|---|---|---|
| ThinkPad made before 2024 (e.g. T14 Gen 4, T14s Gen 1, E14 Gen 2) | Bottom row, between right Alt and right Ctrl, labeled PrtSc | Press it on its own; Fn + PrtSc opens Snipping Tool |
| ThinkPad 2024–2025 (e.g. T14 Gen 5, X1 Carbon Gen 13, P1 Gen 8) | Top row: a Print screen icon on F9, a Snipping Tool icon on F10 | Press F9; if the Esc light is on, press Fn + F9 |
| IdeaPad, Yoga, Legion and other home models | Top row, usually on the right near Insert and Delete | Press it on its own, or with Fn if it's a second label |
| Lenovo Tab (Android tablet) | No key | Power + Volume Down |
| Lenovo Chromebook | Screenshot key, if there is one | Or Shift + Ctrl + Show windows |
ThinkPad: check the bottom row first
On many ThinkPads from the last decade, PrtSc took the place of the menu key. It's between the right Alt and Ctrl, right under your thumb. It's a full key, so you press it without Fn. On models like the T14 Gen 4 and E14 Gen 2, Lenovo's user guides also list Fn + PrtSc, which opens the Snipping Tool app.
The 2024–2025 ThinkPads changed this. Take the T14 Gen 5, X1 Carbon Gen 13 and P1 Gen 8. Lenovo's guides put Print screen on F9 and Snipping Tool on F10, as special functions. When the light on the Esc key is off, the special functions are active, so F9 on its own takes the screenshot. When it's on, the F-keys work as F1–F12, and you need Fn + F9. To switch, press Fn + Esc.
IdeaPad and Yoga: top row, and watch FnLock
On IdeaPad, Yoga and most other Lenovo home laptops, PrtSc is in the top row. Lenovo calls these dual-function keys: each top-row key is both an F-key and a special function. The FnLock switch (Fn + Esc) decides which one you get without holding Fn. Some newer IdeaPad and Yoga keyboards also have a key with a scissors icon that opens Snipping Tool directly.
One detail from Lenovo's docs: FnLock only affects keys in the top row. If PrtSc is printed as a second function on a key outside the top row, always hold Fn with it.
Method 1: Win + Shift + S (works on every Lenovo)
This is the shortcut we recommend to every Lenovo owner, because it doesn't care where PrtSc is or what FnLock is doing.
- Press Win + Shift + S. The screen dims and the Snipping Tool toolbar appears at the top.
- Choose Rectangle, Window, Full screen or Freeform.
- Drag over the area, or click a window.
- Paste with Ctrl + V, or click the notification in the corner to crop it and draw on it.
On Windows 11, the screenshot is also saved to C:\Users\<your name>\Pictures\Screenshots on its own. On Windows 10, it only goes to the clipboard, so click the notification and press Ctrl + S if you need a file.
Method 2: The PrtSc key
What PrtSc does depends on Windows, not Lenovo. On an up-to-date Windows 11 laptop, it opens the same toolbar as Win + Shift + S. On Windows 10, it copies the whole screen to the clipboard without any sign that it worked, and you paste it with Ctrl + V.
Prefer the classic one-press behavior on Windows 11? Open Settings → Bluetooth & devices → Keyboard (on older builds, Settings → Accessibility → Keyboard). Turn off Use the Print screen key to open screen capture.
On ThinkPads made before 2024, Fn + PrtSc opens the full Snipping Tool app instead. That's handy when you need its delay timer. Want PrtSc to open a different screenshot app? See how to change what the Print Screen key does.
Method 3: Win + PrtSc (save the whole screen to a file)
Win + PrtSc saves the whole screen as a PNG file right away. The screen dims for a moment to show it worked. With an external monitor connected, both screens end up in one wide image.
On a 2024–2025 ThinkPad, press Win with the Print screen key (F9), and add Fn if the Esc light is on. On models where PrtSc is a second label, it's Win + Fn + PrtSc.
The file goes to C:\Users\<your name>\Pictures\Screenshots. If you said yes to OneDrive backup while setting up the laptop, look in OneDrive\Pictures\Screenshots instead. Our guide to where screenshots go on Windows covers every location.
Method 4: Alt + PrtSc (one window only)
Alt + PrtSc copies only the active window to the clipboard, with no taskbar and no second monitor. Click the window first, press the keys, then paste. On a ThinkPad with PrtSc in the bottom row, you can do it with one hand: thumb on Alt, then the key next to it.
It doesn't save a file. If you need one, paste into Paint and save, or use Window mode in Win + Shift + S. More options are in how to screenshot one window.
Method 5: The Snipping Tool app (delay, text, recording)
Open Start, type Snipping Tool and press Enter. On older ThinkPads, Fn + PrtSc also opens it, and on newer ones, F10. Some IdeaPad and Yoga models have a scissors key for it. The app adds what the shortcuts lack:
- a 3-, 5- or 10-second delay, to catch menus and tooltips;
- a basic editor with pen, highlighter and crop;
- Text actions, to copy text from the screenshot;
- screen recording to MP4 with Win + Shift + R (Windows 11).
FnLock, Lenovo Vantage and BIOS: make the top row behave
If PrtSc works one day and not the next, FnLock is almost always why. Lenovo gives you three places to control it:
- Fn + Esc switches FnLock right away. The light on the Esc key shows which mode you're in. On ThinkPads, light off means the printed special functions (including Print screen on F9) work without Fn.
- Lenovo Vantage saves the setting for good. On current ThinkPads, open Vantage and go to Device → Input & Accessories. Older Vantage versions let you choose between F1–F12 and special functions for the top row.
- BIOS (UEFI): IdeaPad models have a Hotkey Mode setting. When it's on, the top row does what's printed on the keys. When it's off, the row works as F1–F12, and the printed functions need Fn.
Pick whichever fits how you work. If you take screenshots more often than you press F9 in an app, keep the special functions active.
Faster way: Sleekshot on a Lenovo laptop
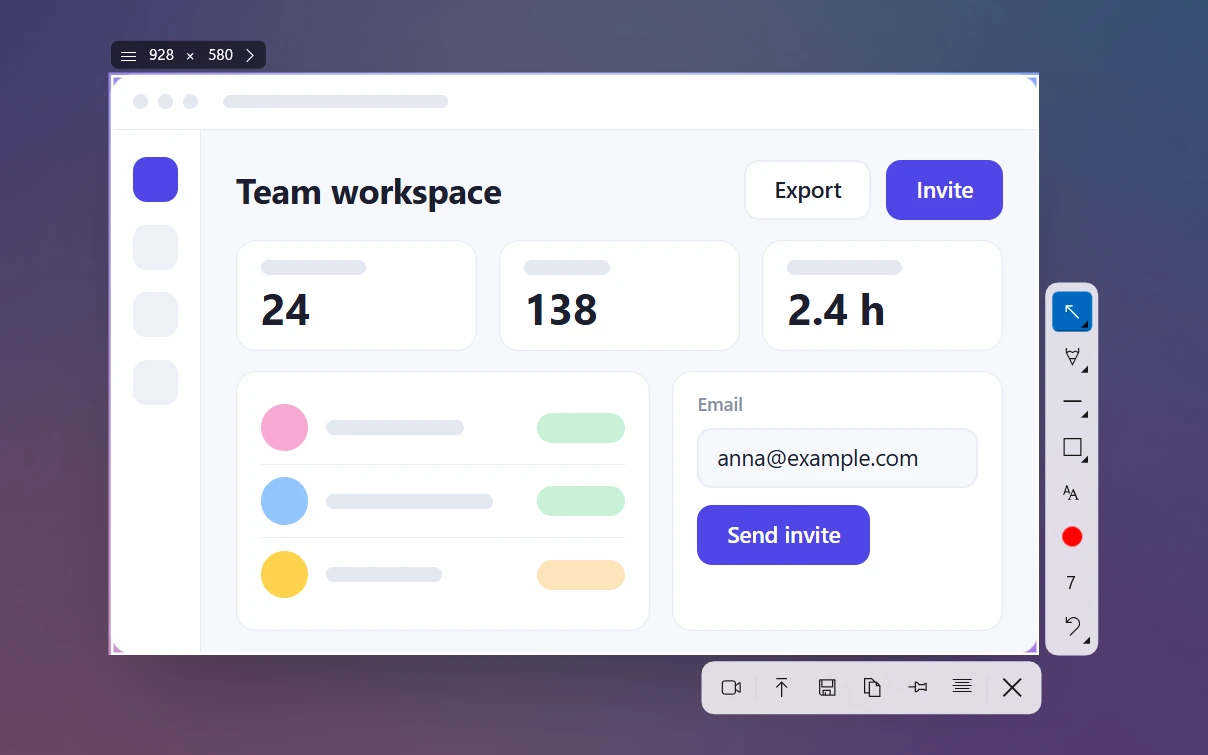
Sleekshot is a free screenshot and screen recording app for Windows 10 and 11. You add arrows and text right on the screenshot, then copy, save or share it with one key. We make it, so here's the plain truth: the built-in tools are enough for simple screenshots. Sleekshot pays off when the screenshot needs an arrow, numbered steps or a blurred email address.
On a pre-2024 ThinkPad, the bottom-row PrtSc key makes a great shortcut. It's right under your thumb, and Sleekshot uses PrtSc by default. On Windows 11, Snipping Tool has that key. The app's Bind PrtSc to Sleekshot button then takes it back in one click. On a newer ThinkPad or an IdeaPad, you can set any key or combination instead.
- Install it from the download page or the Microsoft Store. It's free, with no account and no watermark, and there are x64, x86 and ARM64 builds.
- Press your shortcut. The screen dims. Drag over an area, click a window, or press Ctrl + A for the whole screen.
- Mark it up: arrows (7 styles), step numbers, a blur rectangle, text, highlighter and shapes in 20 colors. See all the drawing tools.
- Finish with one key: Ctrl + C copies, Ctrl + S saves as PNG, JPEG or WebP, Ctrl + U gives you a short link, and Ctrl + O copies the text, recognized on your PC.
Good to know: no scrolling (full-page) screenshots, no delay timer and no GIF export. Arrows and shapes can't be moved once drawn, only undone with Ctrl + Z.
Lenovo tablet or Chromebook?
Lenovo also sells Android tablets and Chromebooks, and the Windows shortcuts don't work there.
- Lenovo Tab (Android): press and hold Power and Volume Down together until the screen flashes. Lenovo's support page says to hold them for about three seconds.
- Lenovo Chromebook (ChromeOS): press the Screenshot key if your keyboard has one, or Shift + Ctrl + Show windows, then choose full screen, partial or window. The file goes to the Downloads folder.
- Yoga 2-in-1 folded into tablet mode: it's still Windows. Open Snipping Tool from Start and tap New, or use the pen menu if you have an active pen.
If PrtSc does nothing on your Lenovo
Go through these in order. The first two fix most cases.
- Switch FnLock with Fn + Esc and try again, with and without Fn.
- Check the Windows switch. On Windows 11, Use the Print screen key to open screen capture may be off. Then PrtSc quietly copies to the clipboard instead of showing the toolbar. Paste into Paint to check.
- Look for an app that took the key. OneDrive, Dropbox and screenshot apps can take over PrtSc.
- Update Lenovo's keyboard driver. Lenovo publishes it as Lenovo Fn and Function Keys for IdeaPad and Yoga, and Hotkey Features Integration for ThinkPad. Install it through Lenovo Vantage (System Update) or your model's support page.
Still stuck? Our full guide to Print Screen not working covers drivers, games and remote desktops, and screenshots without a Print Screen key lists every workaround. For the big picture across brands, see how to screenshot on a laptop.
Frequently asked questions
Where is the Print Screen key on a Lenovo ThinkPad?
What is the screenshot shortcut on a Lenovo laptop?
Why do I have to press Fn to take a screenshot on my Lenovo?
Where do screenshots go on a Lenovo laptop?
How do I take a screenshot on a Lenovo tablet?
Sleekshot Team
We build Sleekshot, a free screenshot and screen recording app for Windows and Mac. Every guide is checked on current Windows 11, Windows 10 and macOS builds.
Also available in: Deutsch Français Español Italiano Русский ភាសាខ្មែរ Bahasa Indonesia 简体中文 日本語