How to Screen Record on a Mac: Shift-Command-5, QuickTime and a Free App
 By Sleekshot Team
12 min read
Short answer
To screen record on a Mac, press Shift-Command-5, choose Record Entire Screen, Record Selected Portion or (on macOS Tahoe 26 and later) Record Selected Window, and click Record. Stop with the Stop button in the menu bar or Command-Control-Esc. The video is saved to the desktop as a .mov file. The built-in tools record your microphone, but the Mac's own sound only on macOS 27 Golden Gate and later. For system audio on older versions, pause, GIF or a webcam, use a free app such as Sleekshot for Mac (recording needs macOS 13 Ventura or later).
On this page
- Ways to screen record on a Mac compared
- Method 1: Screen record with Command + Shift + 5
- Method 2: QuickTime Player screen recording
- Method 3: Sleekshot for Mac (free, with sound, webcam and GIF)
- How to screen record on a Mac with sound
- How to record part of the screen or one window
- How to stop a screen recording on a Mac
- Where do screen recordings go on a Mac?
- The screen recording permission prompt
- Screen recording on a Mac not working? Quick fixes
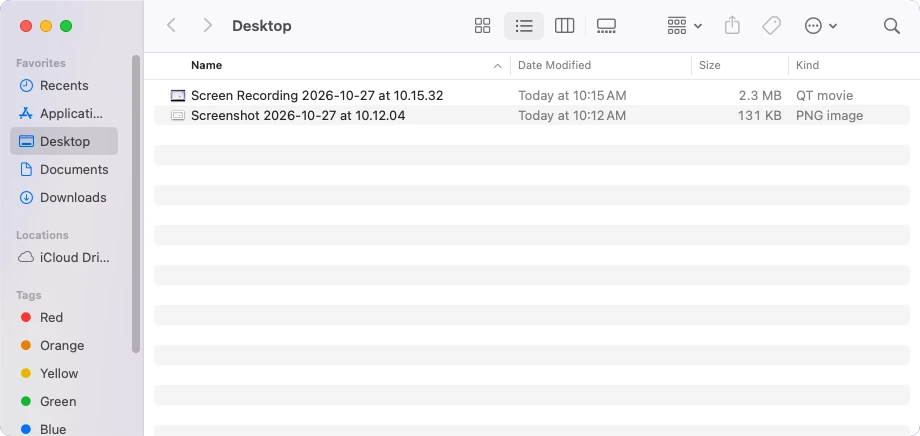
To screen record on a Mac, press ⌘ + ⇧ + 5 (Command + Shift + 5). A toolbar appears at the bottom of the screen. Choose Record Entire Screen, Record Selected Portion or, on macOS Tahoe 26 and later, Record Selected Window, then click Record. To stop, click the Stop button in the menu bar or press ⌘ + ⌃ + Esc. The video lands on your desktop as a .mov file named "Screen Recording" plus the date and time.
It works the same way on a MacBook Air, MacBook Pro, iMac or Mac mini, and nothing needs installing. The built-in recorder has gaps, though. It records the Mac's own sound only on macOS 27 Golden Gate and later. It can't pause, show your webcam or save a GIF. For those, there's a free app, covered in Method 3. Menu names below match Apple's documentation as of October 2026.
Key symbols: ⌘ is Command, ⇧ is Shift, ⌃ is Control. So ⌘⇧5 means Command + Shift + 5. The full list is in our Mac screenshot shortcuts cheat sheet.
Ways to screen record on a Mac compared
Two of these come with macOS. The third is a free app from the Mac App Store.
| Method | Shortcut | System audio | Webcam | Formats | Best for |
|---|---|---|---|---|---|
| Screenshot toolbar | ⌘ + ⇧ + 5 | macOS 27 and later only | No | .mov | A quick clip with nothing to install |
| QuickTime Player | ⌃ + ⌘ + N | Same as the toolbar | No | .mov | Playing or trimming the clip right away |
| Sleekshot for Mac (free) | ⌘ + ⇧ + 2, select, then ⌘ + R | Yes, plus microphone (macOS 13 and later) | Yes, with face masks | MP4, GIF | Tutorials, demos and bug reports with sound |
Our pick: ⌘ + ⇧ + 5 for a silent clip of a few seconds. If you need computer sound on macOS 26 or earlier, a pause button, a GIF or your face in the corner, Sleekshot does it for free on macOS 13 Ventura or later. Not sure a video is even the right format? See screenshot vs screen recording.
Method 1: Screen record with Command + Shift + 5
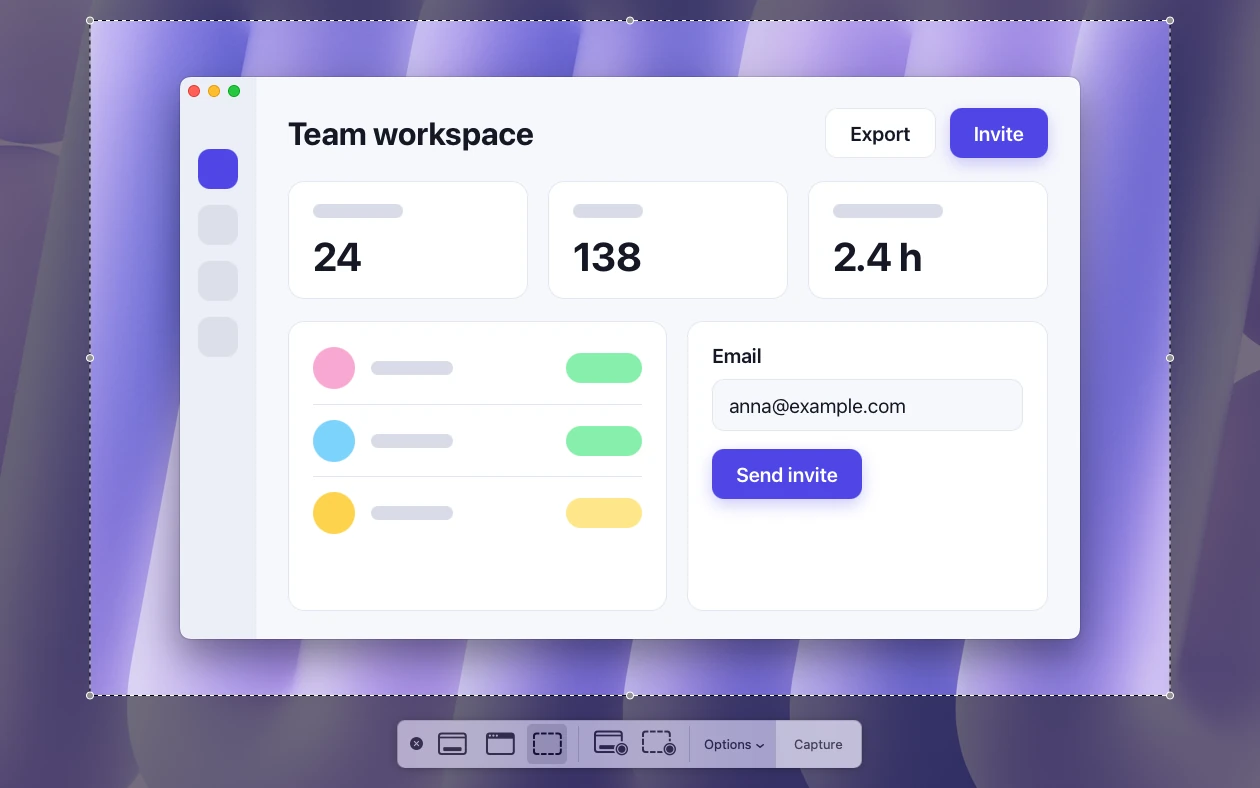
⌘ + ⇧ + 5 opens the Screenshot app, the fastest way to record the screen on any Mac with macOS Mojave or later. The same toolbar takes screenshots, so the left half has screenshot buttons and the recording buttons sit next to them.
- Press ⌘ + ⇧ + 5.
- Pick a recording mode: Record Entire Screen, Record Selected Portion (drag the frame's edges to resize it) or Record Selected Window on macOS Tahoe 26 and later.
- Open Options if you want sound or clicks in the video (see below).
- Click Record. For a selected window, click the window you want.
- When you're done, click the Stop button in the menu bar or press ⌘ + ⌃ + Esc.
A thumbnail slides into the bottom-right corner after you stop. Click it to trim the start and end or to share the clip. Swipe it to the right to save at once. Otherwise the .mov appears on the desktop when the thumbnail goes away.
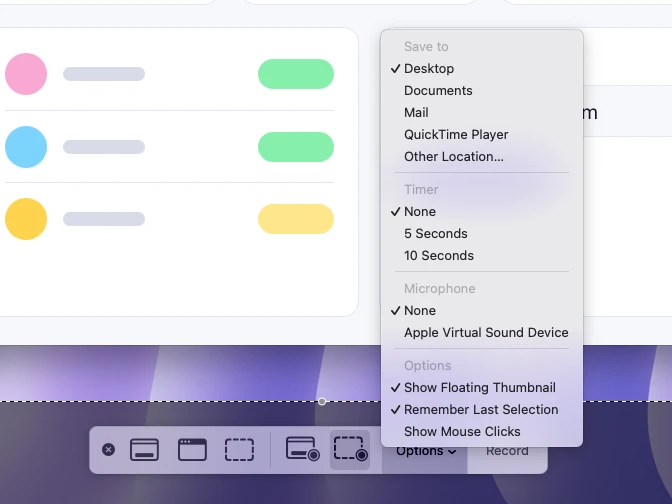
The Options menu holds the settings that matter for video:
| Option | What it does |
|---|---|
| Microphone | Records your voice. Pick a mic, or None |
| Include System Audio | Records the Mac's own sound. Only in macOS 27 Golden Gate and later |
| Show Mouse Clicks | Draws a black circle around the pointer when you click |
| Timer | Waits a few seconds after you click Record |
| Save to | Desktop (default), Documents or Other Location |
| Show Floating Thumbnail | Turns the corner thumbnail on or off |
| Remember Last Selection | Reuses the area you recorded last time |
| Capture Format | HDR or SDR, on supported Macs with macOS Tahoe 26 and later |
What it can't do: there's no pause, no webcam and no drawing on the screen while you record. The file is always a .mov, and before macOS 27 computer sound isn't an option at all. A 15-second "here's the bug" clip doesn't need any of that, so for quick clips this is still the tool we'd use.
Method 2: QuickTime Player screen recording
QuickTime Player comes with every Mac, and its screen recording uses the same Screenshot tools as ⌘ + ⇧ + 5. After you stop, QuickTime opens the recording, so you can watch it and trim it before you send it.
- Open QuickTime Player from the Applications folder.
- Choose File → New Screen Recording, or press ⌃ + ⌘ + N.
- The Screenshot toolbar appears. Pick the whole screen, a window or a portion, and set the microphone in Options.
- Click Record, then stop with the menu bar button or ⌘ + ⌃ + Esc.
- QuickTime opens the video. To cut the ends, choose Edit → Trim, drag the yellow handles and click Trim.
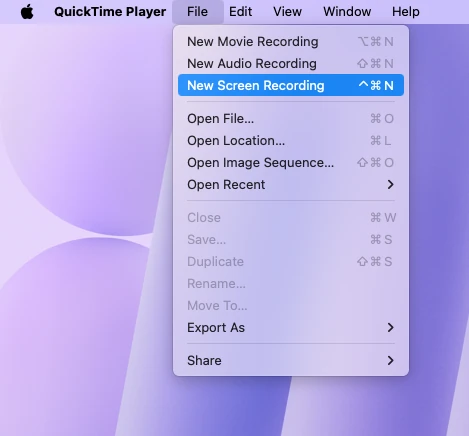
Sound works the same as in the toolbar: a microphone on any version, system audio only on macOS 27 and later. Use QuickTime when you plan to trim the clip before sending it. Otherwise ⌘ + ⇧ + 5 is one step shorter.
Method 3: Sleekshot for Mac (free, with sound, webcam and GIF)
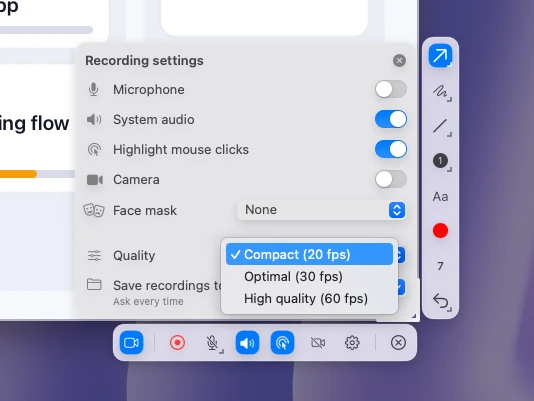
Sleekshot for Mac is a free menu bar app for screenshots and screen recording (Mac App Store; screenshots on macOS 12 or later, recording on macOS 13 Ventura or later). We make it, and its recorder covers what the built-in tools leave out. It records an area, a window or the full screen with system audio and your microphone. You can pause and resume, highlight clicks, draw arrows on the live screen and show your webcam in the corner. When you stop, you save the video as MP4 or GIF, or copy it. Quality presets are Compact (20 fps), Optimal (30 fps) and High quality (60 fps). There's no time limit, no account and no watermark.
- Install Sleekshot from the Mac App Store. The first time, it guides you through the screen recording permission.
- Press ⌘ + ⇧ + 2. The screen freezes and dims.
- Select what to record: drag over an area, click a window, or press ⌘ + A for the full screen. You can resize an area later by dragging the edges.
- Click the record button (the camera icon at the start of the action bar) or press V. The bar switches to video mode.
- Click the gear on the bar to open the recording settings. Turn on Microphone, System audio, Highlight mouse clicks or Camera, pick a face mask and set the quality.
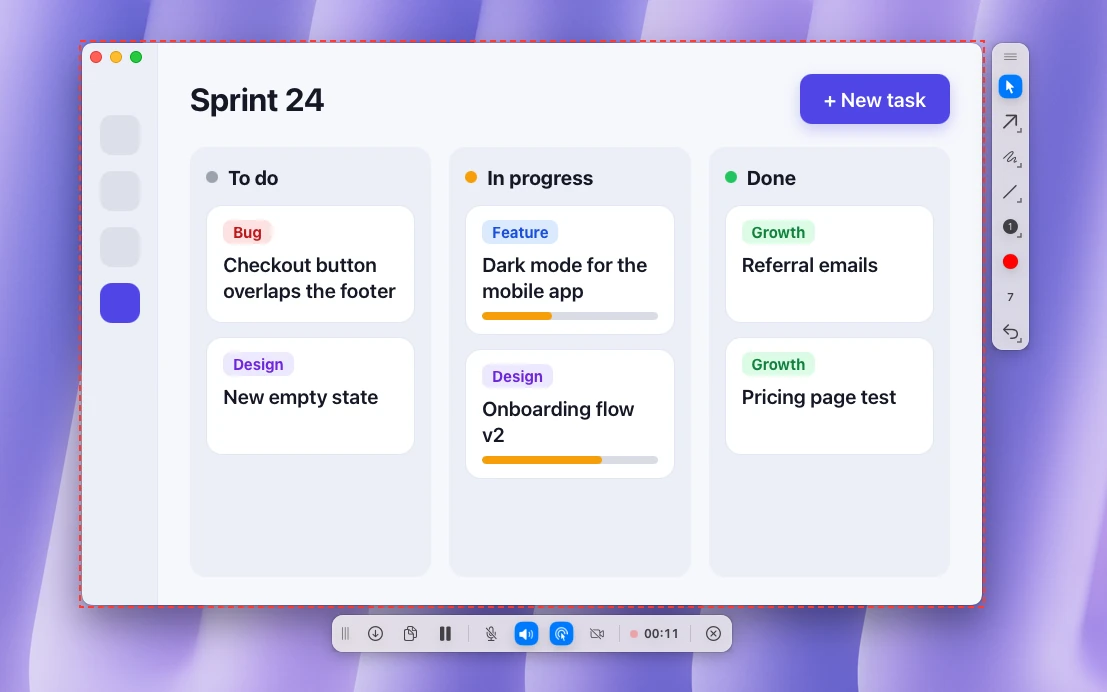
- Press ⌘ + R or click the red record button. A red dashed outline marks the area, and the recording bar shows a red dot and a timer. Use the pause button whenever you need a break.
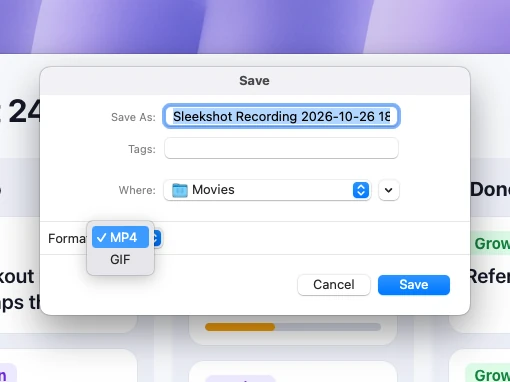
- To stop, click save or copy on the recording bar. Save opens a dialog with the name "Sleekshot Recording" plus the date and time, the Movies folder and a Format menu with MP4 or GIF. Copy puts the video on the clipboard for Slack, Messages or an email.
If you don't need to change any settings, press ⌘ + R right after you select the area. Sleekshot records a fixed rectangle of the screen. If you click a window and then move it during the recording, it leaves the frame.
Webcam and face masks
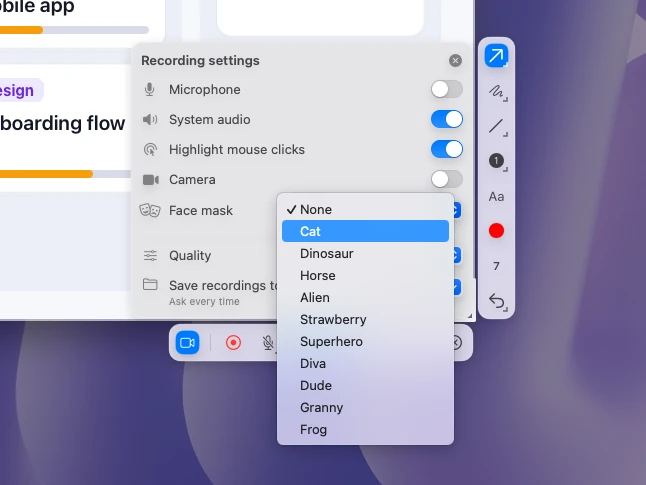
Turn on the camera and your webcam appears in the corner of the video. You see it before you press record, so you can fix the framing first. If you'd rather not show your face, pick one of 10 masks: Cat, Dinosaur, Horse, Alien, Strawberry, Superhero, Diva, Dude, Granny or Frog. Masks blink, wink, smile, laugh and raise their eyebrows with you. With Keep real background ticked you stay in your room; without it, the mask gets a themed background. Face tracking runs on your Mac and needs no internet. More ideas in how to record your screen with a webcam.
Drawing and highlighted clicks
While you record, you can draw on the live screen: point at a button with an arrow or circle a number as you talk. Click highlight marks every click, so viewers can follow the pointer.
What it doesn't do: there's no trimming or video editor, no timer and only one recording area at a time. It's available only on the Mac App Store. To cut the ends, open the MP4 in QuickTime Player and use Edit → Trim. More on the Sleekshot for Mac page.
How to screen record on a Mac with sound
Your voice is easy on any Mac. The Mac's own sound (a video, a call, an app's alerts) depends on your macOS version.
- Microphone: press ⌘ + ⇧ + 5, click Options and choose a microphone under Microphone. Any connected mic shows up there, including AirPods and USB microphones.
- System audio on macOS 27 Golden Gate: in the same menu, turn on Include System Audio.
- System audio on macOS 26 and earlier: the built-in tools can't record it. Use an app that captures computer sound, such as Sleekshot, which records system audio and the microphone together on macOS 13 Ventura or later.
Record five seconds and play them back before the real take. That's how you catch a mic left on None before it costs you a whole recording. The full guide, including what to do when a recording has no sound, is in how to screen record on a Mac with audio.
How to record part of the screen or one window
To record part of the screen, press ⌘ + ⇧ + 5, choose Record Selected Portion and drag the frame's edges until it covers what you need. A smaller area keeps text readable after Slack or YouTube compresses the video. Turn on Remember Last Selection in Options if you record the same spot often.
To record one window on macOS Tahoe 26 or later, choose Record Selected Window, click the window and click Record. On older versions, use Record Selected Portion and drag the frame tightly around the window. In Sleekshot, click the window in the overlay and press ⌘ + R. It records that part of the screen, so keep the window where it is until you stop.
Some apps, such as the Apple TV app, don't let you record their windows, so the video may show a black area where they are.
How to stop a screen recording on a Mac
Click the Stop button in the menu bar at the top of the screen, or press ⌘ + ⌃ + Esc. If an app is in full screen, move the pointer to the top edge to bring the menu bar back, or just use the shortcut.
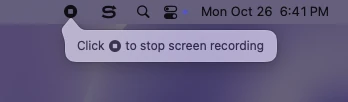
In Sleekshot, you finish from its own recording bar by saving or copying the video. If the Stop button seems to be missing or the recording won't end, see how to stop screen recording on a Mac.
Where do screen recordings go on a Mac?
The built-in tools save recordings to the desktop as .mov files, with names like Screen Recording 2026-10-26 at 10.15.32.mov. To save them somewhere else, press ⌘ + ⇧ + 5, click Options and choose a folder under Save to.
If the file seems late, the floating thumbnail is probably still in the corner. The file is written when the thumbnail disappears, or right away if you swipe it. If you sync Desktop & Documents with iCloud, your recordings live in iCloud Drive too. By default Sleekshot asks where to save each video, suggests the Movies folder and lets you pick MP4 or GIF. To skip the question, turn on Save recordings to a folder in Settings → Video. You can also copy the video without saving a file. Lost a file? See where screen recordings go on a Mac.
The screen recording permission prompt
Apps that record the screen need your permission, Sleekshot included. macOS asks the first time the app tries to record. If you missed it or clicked Deny, open System Settings → Privacy & Security → Screen & System Audio Recording and turn on the switch next to the app. On older macOS versions the section is called Screen Recording.
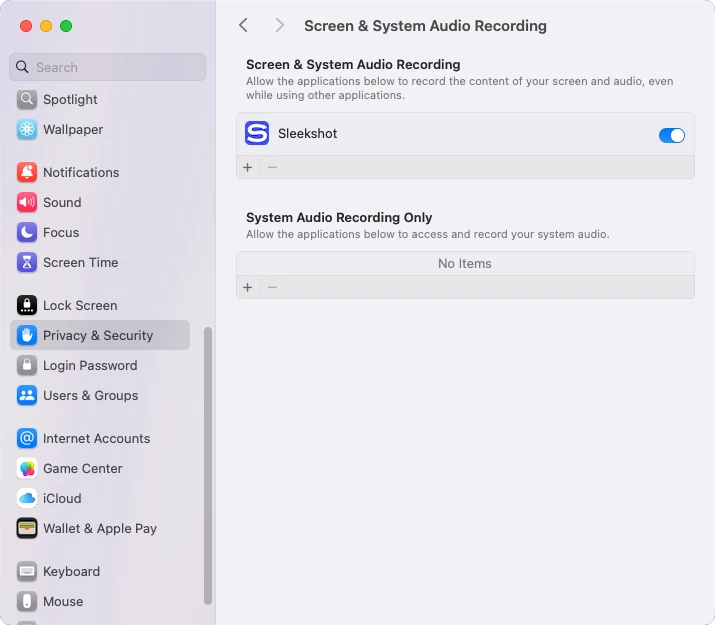
macOS may ask you to quit and reopen the app before the change takes effect. If an app's recording shows only your wallpaper and no windows, the permission is the usual cause.
Screen recording on a Mac not working? Quick fixes
- ⌘⇧5 does nothing. Check System Settings → Keyboard → Keyboard Shortcuts → Screenshots, or click Restore Defaults there. Another app may also use the same keys.
- No sound in the video. Options → Microphone was set to None, or you expected computer sound on macOS 26 or earlier.
- A black window in the video. That app blocks recording of protected video on purpose.
- You can't find the file. Check Options → Save to, then look on the desktop once the thumbnail is gone.
- Another app records only the wallpaper. Give it access under Screen & System Audio Recording, then reopen it.
- The recording stopped on its own. The disk may be full, since long full-screen recordings take a lot of space. Check System Settings → General → Storage.
For still images, the same toolbar covers everything in how to screenshot on a Mac. To compare paid and free recorders, see the best screen recorders for Mac. Apple's own reference is How to record the screen on your Mac.
Frequently asked questions
Can you screen record on a Mac for free?
How do I screen record on a Mac with audio?
How do I stop screen recording on a Mac?
Where do screen recordings go on a Mac?
Is there a time limit for screen recording on a Mac?
How do I record only one window on a Mac?
Sleekshot Team
We build Sleekshot, a free screenshot and screen recording app for Windows and Mac. Every guide is checked on current Windows 11, Windows 10 and macOS builds.
Also available in: Deutsch Français Español Italiano Русский ភាសាខ្មែរ Bahasa Indonesia 简体中文 日本語