Screenshot Not Working on Mac: How to Fix ⌘⇧3, ⌘⇧4 and ⌘⇧5
 By Sleekshot Team
10 min read
Short answer
When screenshots stop working on a Mac, first check whether they're going somewhere else. Shift-Command-5 → Options → Save to may point to the clipboard or a missing folder, and holding Control copies instead of saving. If the keys do nothing, check them again in System Settings → Keyboard → Keyboard Shortcuts → Screenshots, or click Restore Defaults. Then quit apps that use the same keys and restart the Mac.
On this page
- Quick diagnosis: match your symptom
- Fix 1: Check whether the screenshot was actually taken
- Fix 2: Check where screenshots are saved
- Fix 3: Turn the screenshot shortcuts back on
- Fix 4: Find the app that took over ⌘⇧3 or ⌘⇧4
- Fix 5: Check the keyboard itself
- Fix 6: Allow Screen Recording for other screenshot apps
- Fix 7: Restart the screenshot process, or the whole Mac
- Fix 8: Free up disk space and update macOS
- Fix 9: Test in safe mode
- Special cases that look like a broken shortcut
- Still not working? Take screenshots another way
Most of the time, a "broken" Mac screenshot was actually taken and saved somewhere you didn't expect. Press ⌘ + ⇧ + 5, open Options and look at Save to. If it says Clipboard or points to a folder that no longer exists, choose Desktop. Does ⌘ + ⇧ + 3 or ⌘ + ⇧ + 4 do nothing at all? Open System Settings → Keyboard → Keyboard Shortcuts → Screenshots and make sure the shortcuts are checked, or click Restore Defaults. Then quit any app that might use the same keys.
The fixes below go from quickest to most involved. The first four solve most cases in a couple of minutes. Menu names are from System Settings in macOS Ventura and later, as of October 2026. Older versions use similar wording.
Quick diagnosis: match your symptom
Find what you see on screen and jump straight to the fix.
| What you see | Likely cause | Go to |
|---|---|---|
| The thumbnail appears, but there's no file on the desktop | Save to points elsewhere, desktop icons are hidden, or Dropbox moved the file | Fixes 1–2 |
| The file only shows up after a few seconds | The floating thumbnail delays saving | Fix 1 |
| You can paste the screenshot, but there's no file | Control was held, or Save to is Clipboard | Fix 1 |
| No sound, no thumbnail, nothing at all | The shortcut is off or taken by another app | Fixes 3–4 |
| The Screenshot app works, the keys don't | Shortcut settings or the keyboard | Fixes 3–5 |
| Another screenshot app only gets the wallpaper or a black image | Missing Screen Recording permission | Fix 6 |
| It worked yesterday and nothing above helps | A stuck process, a full disk or something that loads at startup | Fixes 7–9 |
| One app's window is black, or files are .heic | App protection or HDR format | Special cases |
Fix 1: Check whether the screenshot was actually taken
macOS rarely fails without a sign, but it often saves in a way that looks like a failure. Check three things first:
- The floating thumbnail. After a screenshot, a small thumbnail sits in the bottom-right corner for a few seconds, and the file is only saved when it disappears. If you hover over it, it stays until you move the pointer away. Swipe it to the right to save right away, or turn it off in ⌘⇧5 → Options → Show Floating Thumbnail.
- The Control key. Control + ⌘ + ⇧ + 3 or 4 copies the screenshot to the clipboard and saves no file. Open Notes or Preview (File → New from Clipboard) and paste to check.
- Search for it. File names start with "Screenshot" plus the date and time. Type Screenshot in a Finder search or in Spotlight (⌘ + Space) to find them, wherever they landed.
Fix 2: Check where screenshots are saved
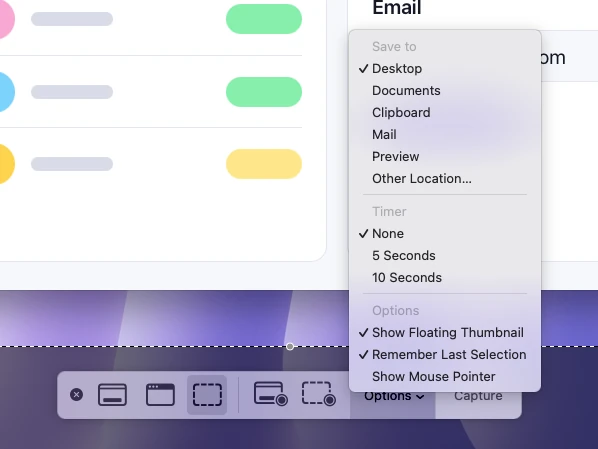
The save folder is the most common reason screenshots "vanish". The ⌘⇧5 toolbar and the ⌘⇧3/⌘⇧4 shortcuts share it.
- Press ⌘ + ⇧ + 5 and click Options.
- Under Save to, see which item is checked. Clipboard, Mail, Messages or Preview means no file on the desktop.
- Choose Desktop, or Other Location and pick a folder you can find. If the old folder was deleted or renamed, or was on a drive that's not connected, pick a new one. macOS can't save into a folder that isn't there.
- Press Esc and take a test screenshot.
You can also see the custom folder in Terminal: defaults read com.apple.screencapture location prints it. If you get an error that the pair "does not exist", the default (Desktop) is in use.
If the setting says Desktop and your desktop still looks empty, check these:
- Desktop icons hidden: in System Settings → Desktop & Dock, Show Items must include On Desktop (macOS Sonoma and later). With it off, files are on the desktop but not shown.
- Stacks: if View → Use Stacks is on (Control + ⌘ + 0), screenshots are grouped into a stack. Click it to expand it.
- iCloud Drive: with Desktop & Documents syncing on, your desktop lives in iCloud Drive. The files are there, but they may take a moment to show up on other Macs.
- Dropbox: with Save screenshots to your Dropbox on (Dropbox → Preferences → Screenshots), ⌘⇧3 and ⌘⇧4 screenshots go to a Screenshots folder in Dropbox.
More on folders and file names: where screenshots go on a Mac.
Fix 3: Turn the screenshot shortcuts back on
If the keys give you no sound, no thumbnail and no file, the shortcuts may simply be turned off. If you've ever used a screenshot app that wanted ⌘⇧4 for itself, the system shortcuts may have been unchecked then and never checked again.
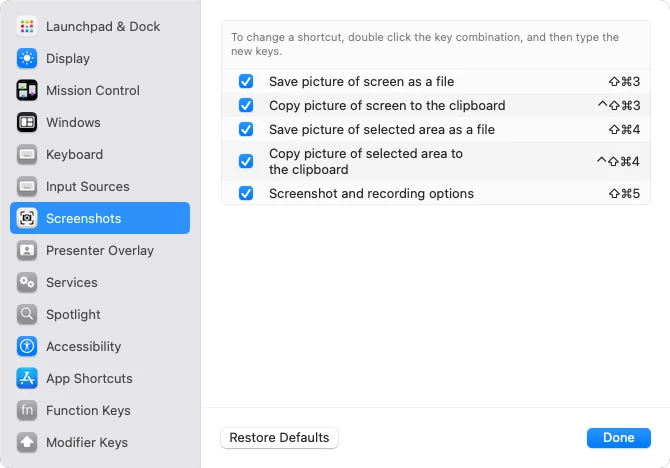
- Choose Apple menu → System Settings, click Keyboard in the sidebar (you may need to scroll), then click Keyboard Shortcuts.
- Click Screenshots in the sidebar.
- Check every shortcut you use. The list has "Save picture of screen as a file" (⌘⇧3) and "Save picture of selected area as a file" (⌘⇧4). It also has the two clipboard versions and "Screenshot and recording options" (⌘⇧5).
- If a shortcut shows the wrong keys, click Restore Defaults in the bottom-left corner. This resets all keyboard shortcuts, not just screenshots.
- Quit and reopen the apps you were using, then try again.
To use a different combination, double-click the current one and press the new keys. Apple notes that a shortcut another command or app already uses won't work, which brings us to the next fix. All the default keys are in our Mac screenshot shortcuts guide.
Fix 4: Find the app that took over ⌘⇧3 or ⌘⇧4
Only one app can have a key combination. If a screenshot app, a keyboard tool or a launcher claimed ⌘⇧4, macOS's own screenshot never runs.
- Screenshot apps (for example, CleanShot X, Snagit or Shottr) can be set to use ⌘⇧3 or ⌘⇧4 instead of the built-in tool. Open the app's settings and change its shortcut, or quit it from the menu bar and test again.
- Keyboard and automation apps that let you set shortcuts for the whole system can also grab these keys. Check their shortcut lists.
- Cloud apps don't block the keys, but they move the files. See the Dropbox note in Fix 2.
The fastest test: quit menu bar apps one at a time and press the shortcut after each one. Sleekshot for Mac uses ⌘ + ⇧ + 2 by default exactly so it doesn't clash with ⌘⇧3, ⌘⇧4 and ⌘⇧5. It also has an optional setting that makes ⌘⇧4 open Sleekshot instead of the built-in tool. If ⌘⇧4 suddenly brings up Sleekshot, that setting is on. Turn it off in Sleekshot's settings to give ⌘⇧4 back to macOS.
Fix 5: Check the keyboard itself
If the Screenshot app works when you open it from Applications → Utilities → Screenshot but the keys don't, test the keyboard.
- Try another Command shortcut, like ⌘ + Space for Spotlight. If that fails too, the problem is the keyboard, not screenshots.
- Windows keyboards: Apple says to press the Windows logo key or Ctrl instead of ⌘, and Alt instead of Option, so try Windows + Shift + 4 first. If you ever swapped modifier keys, check Modifier Keys in the Keyboard Shortcuts window.
- Use the number keys in the top row for 3, 4 and 5, and test the built-in keyboard if you're using an external one. For Bluetooth keyboards, check the battery or reconnect it in System Settings → Bluetooth.
Fix 6: Allow Screen Recording for other screenshot apps
The built-in tool needs no permission, but every other screenshot app does. Without it, screenshots usually show only the desktop wallpaper and the app's own windows, or a black image.
- Open System Settings → Privacy & Security and click Screen & System Audio Recording (called Screen Recording in older versions).
- Find your screenshot app and turn its switch on. If it's already on, turn it off and on again.
- If the app isn't listed, click the + button under the list and add it from Applications.
- Quit and reopen the app.
Terminal needs the same permission if you take screenshots with the screencapture command.
Fix 7: Restart the screenshot process, or the whole Mac
When the shortcut worked an hour ago and now does nothing, a stuck system process is a likely cause. Many Mac users fix it by restarting SystemUIServer, the process behind the menu bar. Open Terminal and run killall SystemUIServer. The menu bar disappears for a second and comes back.
If you changed the save folder in Terminal earlier, run defaults delete com.apple.screencapture location and then killall SystemUIServer to put screenshots back on the desktop. If neither helps, choose Apple menu → Restart. A restart clears more than any single command.
Fix 8: Free up disk space and update macOS
A nearly full startup disk can stop new files from being saved. Check System Settings → General → Storage. A few gigabytes free is enough for screenshots. Then install any updates in System Settings → General → Software Update, plus updates for your screenshot and keyboard apps. Apple's own troubleshooting guide says updates are more likely than any other step to fix problems caused by software that loads at startup.
Fix 9: Test in safe mode
Safe mode starts the Mac without login items and extra extensions. That tells you whether another app is to blame.
- Mac with Apple silicon: shut down, then press and hold the power button until you see "Loading startup options". Select your startup disk, hold Shift and click Continue in Safe Mode.
- Intel-based Mac: turn it on and immediately hold Shift until the login window appears.
Take a screenshot in safe mode. If it works, a login item or app is getting in the way. Restart normally and remove recent additions one at a time in System Settings → General → Login Items (Login Items & Extensions in newer versions).
Special cases that look like a broken shortcut
- One app comes out black or missing. Apple says some apps, like the Apple TV app, might not let you take screenshots of their windows. Protected video from streaming services usually comes out black. That's on purpose.
- Files are .heic instead of .png. On supported Macs with macOS Tahoe 26 or later, ⌘⇧5 → Options → Capture Format → HDR saves HEIF files. Choose SDR for PNG files that every app opens.
- Work Mac. On a Mac managed by your company, a device management profile can block screenshots. If System Settings shows a profile under Device Management (or Profiles), ask your IT team.
Still not working? Take screenshots another way
If the keys still won't work, you can get around them:
- Open the Screenshot app directly from Applications → Utilities → Screenshot, or search for it in Spotlight, and click Capture.
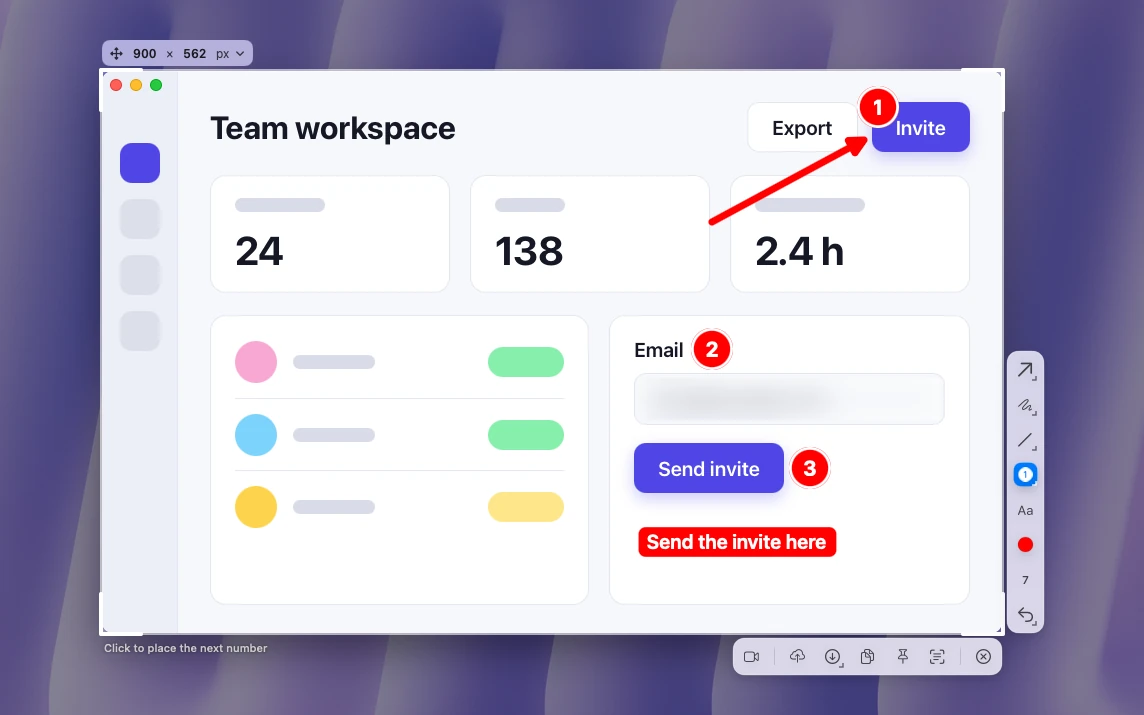
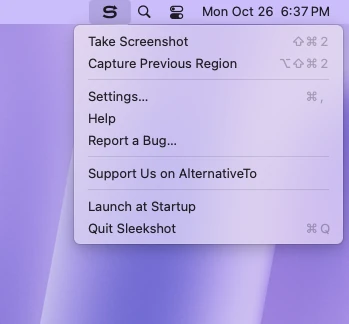
- Use a menu bar screenshot app with its own shortcut. Sleekshot for Mac is a free menu bar app for screenshots and screen recording (Mac App Store; screenshots on macOS 12 or later, recording on macOS 13 Ventura or later). Press ⌘ + ⇧ + 2, then drag over an area, click a window or press ⌘ + A for the full screen. Add an arrow or blur, then copy the result (⌘ + C), save it (⌘ + S) or press ⇧ + ⌘ + C to copy the text in it.
It won't fix the system shortcut, and like any other screenshot app, it needs Screen Recording permission (it walks you through that the first time). It has no timer and doesn't take scrolling screenshots, so for a delayed screenshot you still need ⌘⇧5. If you mostly need a quick screenshot with an arrow or a blurred email, you no longer depend on the system keys. And if screen recording is what stopped working, Sleekshot records too on macOS 13 Ventura or later: an area, a window or the full screen, to MP4 or GIF, with system audio and your microphone. The steps are in how to screen record on a Mac. More about the free Mac app.
If even ⌘ + ⇧ + 2 does nothing, another app may be holding that shortcut too. Click the Sleekshot icon in the menu bar and choose Take Screenshot. Capture Previous Region in the same menu selects the area you used last time (⌥ + ⇧ + ⌘ + 2). You can set a different shortcut in Sleekshot's Settings → Screenshots.
On a Windows PC instead? See Print Screen not working on Windows.
Frequently asked questions
Why are screenshots not working on my Mac?
Why does Command-Shift-4 do nothing on my Mac?
Where did my screenshot go on Mac?
Why are my Mac screenshots black or show only the wallpaper?
How do I reset screenshot settings on a Mac?
How can I take a screenshot if the shortcut doesn't work?
Sleekshot Team
We build Sleekshot, a free screenshot and screen recording app for Windows and Mac. Every guide is checked on current Windows 11, Windows 10 and macOS builds.
Also available in: Deutsch Français Español Italiano Русский ភាសាខ្មែរ Bahasa Indonesia 简体中文 日本語