
How to Screenshot on a Dell Laptop (Inspiron, XPS, Latitude, Dell Pro)
 By Sleekshot Team
8 min read
By Sleekshot Team
8 min read
Short answer
On most current Dell laptops, Print Screen is on the F10 key. Press F10 (or Fn + F10 if Fn lock is on) to take a screenshot, or Win + F10 to save the whole screen to Pictures > Screenshots. Fn + Esc turns Fn lock on and off. Win + Shift + S works on every Dell, including XPS models with a touch function row and no Print Screen key at all.
On this page
- Dell laptop screenshot shortcuts at a glance
- Where is the Print Screen key on a Dell laptop?
- F10 or Fn + F10? Dell's Fn lock explained
- Method 1: Win + Shift + S on any Dell
- Method 2: F10 (Print Screen)
- Method 3: Win + F10 to save the whole screen
- Method 4: Alt + F10 for the active window
- XPS with a touch function row, and 2-in-1s
- Where screenshots are saved on a Dell laptop
- A faster option for Dell laptops: Sleekshot
- Dell Print Screen not working? Quick fixes
To take a screenshot on a Dell laptop, press Win + Shift + S, drag over the area you want and paste it with Ctrl + V. If you'd rather use the Print Screen key, on most current Dell laptops it's on F10. Press F10 on its own, or Fn + F10 if Fn lock is on. Use Win + F10 to save the whole screen to Pictures\Screenshots.
That F10 detail trips up most Dell owners. Often no key says "Print Screen" in big letters, and the Fn key changes what F10 does. Below: where Print Screen is on Dell keyboards (checked against Dell's owner's manuals) and how F10 differs from Fn + F10. We also cover every built-in method, XPS models with a touch function row, and where the files go. Everything is current as of October 2026.
Dell laptop screenshot shortcuts at a glance
"PrtScr" below means the Print Screen function. On many Dell laptops, that's F10. Add Fn if Fn lock is on.
| What you want | Keys on a Dell laptop | Where the screenshot goes |
|---|---|---|
| Select an area (every Dell) | Win + Shift + S | Clipboard + Pictures\Screenshots (Windows 11) |
| Quick screenshot | F10 / PrtScr (or Fn + F10) | Windows 11: opens the Snipping Tool toolbar. Windows 10: whole screen to clipboard |
| Save the whole screen as a file | Win + F10 (or Win + Fn + F10) | Pictures\Screenshots (PNG) |
| Copy only the active window | Alt + F10 (or Alt + Fn + F10) | Clipboard |
| Dell keyboards with no PrtScr | Fn + Insert (per Dell, e.g. KM3322W) | Same as PrtScr |
| Add arrows and share right away | Sleekshot (free), any key you choose | Clipboard, a folder, or a share link |
The one shortcut that works on every Dell, whatever the keyboard: Win + Shift + S.
Where is the Print Screen key on a Dell laptop?
Dell's support article on the Print Screen key says it plainly: on laptop keyboards, Print Screen is usually in the function-key row, "often" F10. For the models below, we checked the keyboard shortcut tables in Dell's own owner's manuals.
| Dell model (from Dell's manual) | Print Screen | Note |
|---|---|---|
| Inspiron 15 3520 | F10 | Fn + F10 gives a normal F10 |
| Inspiron 15 3535 | F10, plus a PrtScr key | Fn + PrtScr turns wireless on/off |
| XPS 13 9310, XPS 13 9315 | F10 | Fn + Esc turns Fn lock on/off |
| XPS 13 9340 | Not listed | Touch-sensitive function row |
| Latitude 7440 | F10, plus a PrtScr key | Fn + PrtScr turns wireless on/off |
| Dell 15 (DC15250), Dell Pro 14 (PC14250) | F10 | 2025 models under Dell's new names |
In 2025, Dell renamed its laptops (Dell, Dell Pro, Dell Pro Max), and in 2026 it brought back the XPS name. The F10 layout carried over to the newer models we checked. For any other model, open its owner's manual on dell.com and look for the "Keyboard shortcuts" page. It lists the Print Screen key.
No PrtScr at all? Some Dell keyboards, like the KM3322W wireless keyboard, have no Print Screen key. Dell says to press Fn + Insert instead. If your laptop has neither, use Win + Shift + S. Our guide to where the Print Screen key is covers other layouts.
F10 or Fn + F10? Dell's Fn lock explained
Out of the box, Dell's top row is in "multimedia" mode. F10 on its own does Print Screen, and Fn + F10 sends a normal F10 to your apps. Press Fn + Esc, and Fn lock swaps them.
| Fn lock | Pressing F10 alone | Pressing Fn + F10 |
|---|---|---|
| Off (default on most models) | Print Screen | Normal F10 |
| On (after Fn + Esc) | Normal F10 | Print Screen |
That's why the same laptop seems to "need Fn" one week and not the next: someone pressed Fn + Esc. To set it for good, use the BIOS. Restart, press F2 when the Dell logo appears, and look for Function Key Behavior (on some models, Fn Lock Options). Choose the mode you want and save.
Method 1: Win + Shift + S on any Dell
Win + Shift + S opens the Snipping Tool toolbar. It doesn't use F10 or PrtScr, so Fn lock doesn't matter.
- Press Win + Shift + S. The screen dims.
- Choose Rectangle, Window, Full screen or Freeform on the toolbar.
- Drag over the area with the touchpad, or click a window.
- Paste with Ctrl + V, or click the notification to edit and save it.
On Windows 11, each screenshot is also saved to Pictures\Screenshots on its own. On Windows 10, it stays on the clipboard until you save it.
Method 2: F10 (Print Screen)
On Windows 11, Print Screen (F10 or Fn + F10, depending on Fn lock) opens the same toolbar as Method 1. On Windows 10, it copies the whole screen to the clipboard. Nothing appears on screen, so paste with Ctrl + V to check.
Dell's article describes the classic behavior: Print Screen "copies the entire desktop to the clipboard". To get that back on Windows 11, turn off Use the Print screen key to open screen capture in Settings → Bluetooth & devices → Keyboard (on older builds, Settings → Accessibility → Keyboard). See how to change what the Print Screen key does for other options.
Method 3: Win + F10 to save the whole screen
Win + Print Screen saves a PNG of the whole screen without pasting. Dell's article confirms it goes to Pictures > Screenshots. On a Dell with Print Screen on F10, that's Win + F10, or Win + Fn + F10 with Fn lock on. The screen dims for a moment to show it worked.
Method 4: Alt + F10 for the active window
Click the window you want, then press Alt + Print Screen (Alt + F10, plus Fn if needed). Only that window is copied to the clipboard. Paste with Ctrl + V. More options: how to screenshot a window.
XPS with a touch function row, and 2-in-1s
Some XPS models swap the physical F-keys for a touch-sensitive row. On the XPS 13 9340, for example, Dell's manual says Fn switches the row between F1–F12 and media controls, and Fn + Esc locks the mode. The manual's shortcut list has no Print Screen, so on these models:
- use Win + Shift + S, which works without any Print Screen key;
- open Snipping Tool from Start when you need a delay;
- or give a screenshot app a key you do have (see Sleekshot below).
On Dell 2-in-1 laptops in tablet mode, try holding Power and pressing Volume Up. Windows supports this combination on devices with hardware buttons, though not every model responds to it. With a pen, the Windows 11 pen menu includes Snipping Tool by default.
Where screenshots are saved on a Dell laptop
Dell keeps the Windows defaults:
- Win + Print Screen and the Windows 11 Snipping Tool:
C:\Users\<your name>\Pictures\Screenshots. - If OneDrive backs up Pictures:
OneDrive\Pictures\Screenshots. - Print Screen on Windows 10, Alt + Print Screen: clipboard only. Paste with Ctrl + V.
Can't find a file? See where screenshots go on Windows.
A faster option for Dell laptops: Sleekshot
The built-in tools are fine for a quick screenshot. But a screenshot that explains something needs an arrow to a button, numbered steps or a blurred email. Then you end up jumping between the screenshot tool, an editor and an upload site. Sleekshot is a free screenshot and screen recording app for Windows 10 (1809+) and 11. You add arrows and text right on the screenshot, then copy, save or share it.
On a Dell, it helps in two ways:
- You pick the key. Sleekshot uses Print Screen by default, but you can set any key or combination. On an XPS without Print Screen, or when F10 vs Fn + F10 keeps changing, pick a combination that always works.
- Click the tray icon to take a screenshot. That's handy on a 2-in-1 or with just the touchpad.
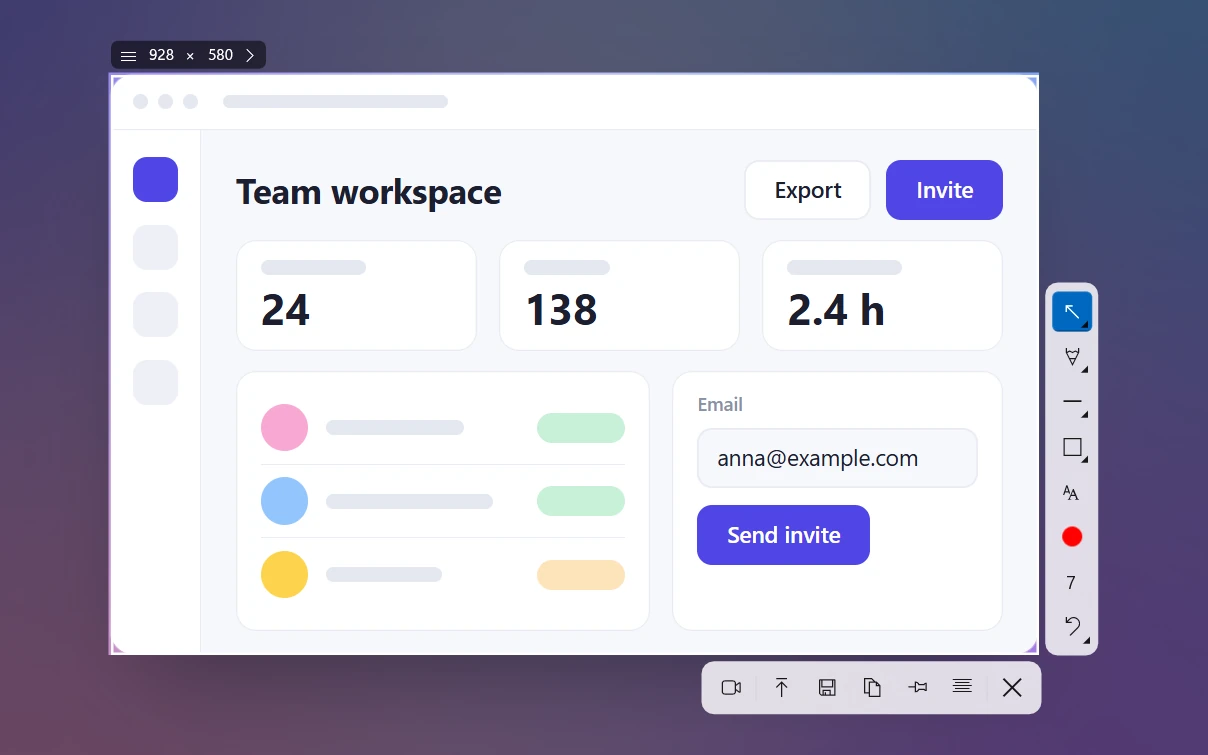
Then drag over an area, click a window or press Ctrl + A for the whole screen. Add arrows (7 styles), step numbers, blur or text. Finish with Ctrl + C, Ctrl + S, or Ctrl + U for a share link without an account. It doesn't take scrolling screenshots, delayed screenshots or GIFs. The Snipping Tool app covers delays.
Dell Print Screen not working? Quick fixes
- Try both F10 and Fn + F10. One of them is Print Screen, depending on Fn lock.
- Switch Fn lock with Fn + Esc, then try again.
- Lost Wi-Fi? On some models, Fn + PrtScr turns wireless on and off, so you turned it off. Press the same keys to turn it back on, and take screenshots with PrtScr alone or F10.
- Check the Windows setting and other apps. On Windows 11, Print Screen opens the Snipping Tool toolbar unless you turned that off. OneDrive, Dropbox or another screenshot app can take over the key.
- Update the drivers and BIOS through Windows Update or your model's page on Dell's support site.
Step-by-step fixes are in our guide to Print Screen not working. Other brands: see the laptop screenshot guide. Sources: Dell's Print Screen key article and owner's manuals (for example, the Inspiron 15 3520 keyboard shortcuts).
Frequently asked questions
Which key is Print Screen on a Dell laptop?
Do I need to press Fn to screenshot on a Dell laptop?
How do I take a screenshot on a Dell XPS with a touch function row?
Where do screenshots go on a Dell laptop?
Why does my Dell turn off Wi-Fi when I try to take a screenshot?
Sleekshot Team
We build Sleekshot, a free screenshot and screen recording app for Windows and Mac. Every guide is checked on current Windows 11, Windows 10 and macOS builds.
Also available in: Deutsch Français Español Italiano Русский ភាសាខ្មែរ Bahasa Indonesia 简体中文 日本語